Cliffy
What I've found so far-
The saw blade angularity was maybe .002 difference on the diameter Not enough to worry about,
I found .008 gap by the gap adjusting screw (using a feeler gauge) midpoint in the SS bar and .009 gap at the far end in the slot in the SS table top slot.
After adjusting the gap screw for min play in that area (screw it down) and yet let it slide smoothly- I took a center punch and tapped one dimple at the far end of the bar to take up the slack in that area (in the upper half of the bar). The dimple was just a little too much and the bar would not go into the table top slot (as designed!) and I took a fine file and just kissed a little off the raised dimple and the bar slid in with maybe .001 play. Tight enough for government work.
I then put the bar in the MiterSet and it had about .004 play after resetting the screw for the SS table top so I slid a .003 feller gauge in between the bar and the MiterSet slot to take up that slop. Now I carefully reset my SS miter to the 8 sided pins in the MiterSet.
I cut 8 more trial pieces and when the octagon was assembled it was not perfect but way better than before. I had "maybe" 1/64th gap in the last segment joint (angles from 0 to 1/64 on the outer circumference). If I was making 8 segment bowl rings I could have wrapped the segment s with a large band clamp and the 1/64 would have disappeared in the glue up. As I'm making an octagonal clock face I need perfection in the fits so just a little touch up with a square sanding block and things came together so any differences would be taken up in the glue thickness around the circle.
I feel this might be as good as I can get using the SS table saw. Good enough to use but not absolute perfection in the angles.
Quite possible with a very high end table saw the MiterSet might do a perfect job IF the slop was absent in the slots.
BuckeyeDennis
Good to hear that you got to the bottom of it. I like your idea of adjusting the miter-bar width at the end. It’s always bugged me that the adjustment screw only widens the center of the bar. That takes out side-side slop, but not miter-angle slop.
One more thought: do you have your main table tied to the auxiliary table (with connector tubes)? That’s pretty much essential for high-precision work on a Shopsmith. Used by itself, the main table can flex several thousandths side-side under just light force.
Cliffy
That's one area I need to examine and didn't. I looked at tying them together but I haven't figured out how to clamp the connector tubes into the tables on mine as I see no set screws or other locking mechanism
That is something I will do as soon as I figure out how, time didn't allow it right now.
BTW Dennis I once 50 years ago worked as a field mechanic for Continental Airlines and was posted to Columbus for the rose bowl charter flights The highest temp for the week was 7 degrees !!!!
dusty
Yes, the miter slots and the blade need to be parallel but that is not what this discussions has been all about. The OP has stated that there is excessive slop between the miter bar and the miter slot in the MiterSet. The adjustment screw in the Shopsmith miter bar is NOT there for the purpose of reducing that slop. It is there to lock the miter bar in the miter slot. Even locked there is some wiggle in the miter slot.
I don't have one of the new MiterSets but my old version (one of the first) exhibits virtually no slop.
[font=]Note that in this video there was no discussion about "adjusting the miter bar".[/font]
Also note that the pins are the proper distance apart to accomodate the Shopsmith Miter Gauge.
RFGuy
Wow, in that video around about the 2:15 mark if you watch closely you can see significant slop between the miter bar and the MiterSet as he is inserting the miter bar into it. Yeah, I know the miter bar screw isn't intended for taking up this slop but it sure does come in handy to minimize some of it. An alternative to attempt to get more repeatable results would be to push the miter gauge to one side in the MiterSet while pushing it forward on the pins for setting the angle. If you always reference one side of the MiterSet then this play can also be largely minimized.
BuckeyeDennis
Dusty, I use the taper screw in my miter gauge bar both to lock the bar (when needed), and to minimize side-side slop during normal operations. I just perused the alignment manual, and found no mention of it. Are you saying that it should not be used to adjust out side-side slop? If so, why?
dusty
BuckeyeDennis wrote
Dusty, I use the taper screw in my miter gauge bar both to lock the bar (when needed), and to minimize side-side slop during normal operations. I just perused the alignment manual, and found no mention of it. Are you saying that it should not be used to adjust out side-side slop? If so, why?
No, I am not saying that it should not be used for that. Only that it was not originally intended for that. In the beginning, I do not believe that Shopsmith was designing for such precision requirements. I have said before - 1/64" (.0156") is reasonable for garage shop precision.
I just measured the slop in my MiterSet with a Shopsmith Miter Gauge and I can slip in a .0015" feeler gauge on each side (.003" slop) of the miter bar.
Cliffy
If one looks carefully while he is setting the 7 side angle you can see that the SS miter gauge will not engage the 8 side pin and it will be short of the 6 side pin tangent point as I pointed out in the OP. The 8 or 6 pins are useless unless some kind of extension fence or bar is used on the SS miter gauge.
Once I figured out how to take up some of the slop in the bar to slot dimensions then things started to come together better but not perfect.
I think I might do even better if I can find out how to lock the two tables together with the extension tubes in my 510- back to the books to try to find the info
Still looking for that perfection of angle cuts
I agree that I don't think SS ever designed this tool for such close work. I may be pushing the limits here.
Careful use of the disc sander has been useful to close up the small gap so far
dusty
Cliffy wrote
If one looks carefully while he is setting the 7 side angle you can see that the SS miter gauge will not engage the 8 side pin and it will be short of the 6 side pin tangent point as I pointed out in the OP. The 8 or 6 pins are useless unless some kind of extension fence or bar is used on the SS miter gauge.
Once I figured out how to take up some of the slop in the bar to slot dimensions then things started to come together better but not perfect.
I think I might do even better if I can find out how to lock the two tables together with the extension tubes in my 510- back to the books to try to find the info
Still looking for that perfection of angle cuts
I agree that I don't think SS ever designed this tool for such close work. I may be pushing the limits here.
Careful use of the disc sander has been useful to close up the small gap so far
Yes, I see that 6 an 8 don't work without an extension of the miter face. I had not seen that before. I was looking for slop in the miter bar only I guess..
RFGuy
Cliffy wrote
If one looks carefully while he is setting the 7 side angle you can see that the SS miter gauge will not engage the 8 side pin and it will be short of the 6 side pin tangent point as I pointed out in the OP. The 8 or 6 pins are useless unless some kind of extension fence or bar is used on the SS miter gauge.
Once I figured out how to take up some of the slop in the bar to slot dimensions then things started to come together better but not perfect.
I think I might do even better if I can find out how to lock the two tables together with the extension tubes in my 510- back to the books to try to find the info
Still looking for that perfection of angle cuts
I agree that I don't think SS ever designed this tool for such close work. I may be pushing the limits here.
Careful use of the disc sander has been useful to close up the small gap so far
Cliffy,
I still suspect you are using the MiterSet wrong. As I pointed out in your original thread (link below), you should easily be able to do 6 (or 7) segments using the MiterSet with no extension fence to a Shopsmith miter gauge. It is ONLY at the 8 sided that is a problem. All of these reference the "00" position so the miter gauge should easily span 00 to 6. I don't understand why you keep saying that 6 doesn't work. It would be helpful if you can post some pics of what you are doing.
https://forum.shopsmith.com/viewtopic.php?p=280468#p280468
https://vsctools.com/wp-content/uploads/2016/08/MiterSet-Segments-Manual.pdf
edflorence
Thanks for posting the link to the manual, RFGuy..
the manual contains this sentence:
"Some miter gauges have a narrow face and may require
the addition of a sacrificial face extension to reach all
sector holes on the MiterSet jig. We include a 6”
aluminum bar for the Shopsmith version for just this
purpose. Simply place the bar against the tapered pins
and press the face of the gauge firmly against the bar. "
Apparently the Miter Set should include this extension.
Ed
RFGuy
edflorence wrote
Thanks for posting the link to the manual, RFGuy..
the manual contains this sentence:
"Some miter gauges have a narrow face and may require
the addition of a sacrificial face extension to reach all
sector holes on the MiterSet jig. We include a 6”
aluminum bar for the Shopsmith version for just this
purpose. Simply place the bar against the tapered pins
and press the face of the gauge firmly against the bar. "
Apparently the Miter Set should include this extension.
Ed
Ed,
Agreed, but he doesn't want to use the 6" aluminum bar and he doesn't want to make a sacrificial fence. My point is he keeps saying that the Shopsmith miter gauge won't reach the 6 pin and I showed pics of mine showing the opposite. I didn't even use the aluminum bar in my pics to reach the 6 pin.
Unless the earlier Shopsmith miter gauges are a lot smaller than mine I don't understand why he has a problem. Hence we need pics from him.
DLB
That manual posted by RFGuy says "The angles for each segment count are built into the plate and are accurate to within .001”." Really? In DMS notation, IIRC, that is .001 seconds, one second being 1/3600 of a degree. So accurate within 1/360000 degrees? I've worked on some pretty accurate equipment, but I don't think I've ever seen anything capable of measuring with resolution better than tenths of seconds. They must mean something else, but even .001 degrees seems wildly optimistic. Is there another use for the close quote symbol in measuring angles just for confusion?
- David
RFGuy
DLB wrote
That manual posted by RFGuy says "The angles for each segment count are built into the plate and are accurate to within .001”." Really? In DMS notation, IIRC, that is .001 seconds, one second being 1/3600 of a degree. So accurate within 1/360000 degrees? I've worked on some pretty accurate equipment, but I don't think I've ever seen anything capable of measuring with resolution better than tenths of seconds. They must mean something else, but even .001 degrees seems wildly optimistic. Is there another use for the close quote symbol in measuring angles just for confusion?
- David
David,
I didn't read it that way, but I can see your point. On pages 3 and 4 they seem to be indicating to me that their hole placement (for each angle) is accurate to 0.001". In other words that is the precision of the milled holes by their CNC. I think they mis-spoke in that one sentence and they only intended to point out their CNC accuracy. It would be good to know what the intended accuracy is for the finished angle and they would have to publish it for each segment option.
edflorence
David...I read the " symbol as meaning inch in this context, rather than seconds.
RFGuy...as far as I know, there has never been a change in the width of the miter bars. You are right...pictures would help clarify things with this issue. By the way, I followed up on your post by finding the manual for the Standard Miter Set and it includes the following:
If you are
able to feel movement of the miter bar within the slot it
will have no bearing on the accuracy of the angle you set
The manual states that the miter bar slots are milled deliberately slightly oversize to allow for variations in miter bars. I don't understand how this could not affect the accuracy of the setting. As has been mentioned, maybe making sure that one edge of the miter bar is snugged up against one side of the slot would eliminate this, but the manual does not say you should need to do that. Interesting.
FWIW, I have one of the original, non-aluminum Miter Set Standards and have had good luck using it to set 45's on my miter gage without gapping in the finished joints. Haven't tried any multi-segment rings with it. I never noticed any slop in the miter slot before but after reading this thread I will have a closer look.
Ed
chapmanruss
RFGuy,
Thanks for including the Manual. I can see in your previous post's picture that the miter touches the 6 segment pin but from the angle I cannot be sure it is fully touching across the pin as suggested by cliffy.
I don't believe the width of the Shopsmith miter protractor face has changed. I compared a greenie, older gray and a newer gray and they are all the same width. It is interesting that the manual says to use the supplied bar for narrower miters but cliffy's apparently didn't have it. The Shopsmith online catalog only mentions the Detent Bar (Standard jig only) but nothing about a 6” aluminum bar for the Shopsmith version as stated in the Manual on page 7.
I checked my Miterset Standard since I only have the standard with three miters and a spare bar. 2 and the spare bar could only take a .002" feeler gauge and 1 a .003" gauge. All were checked at the same point on the Miterset and the bars at the end of the slit away from the miter protractor and handle. These were all newer type bars with the "T" track washer and varying degrees of wear/use. I did not try any older original/500 bars.
RFGuy
chapmanruss wrote
RFGuy,
Thanks for including the Manual. I can see in your previous post's picture that the miter touches the 6 segment pin but from the angle I cannot be sure it is fully touching across the pin as suggested by cliffy.
Yeah, there is definitely parallax in the picture, but I can assure you that the edge of the pin (at its peak) is sitting on the edge of the miter gauge with maybe a few mm to spare for the "6" position.
chapmanruss
RFGuy,
Thanks for the clarification.
RFGuy
chapmanruss wrote
RFGuy,
Thanks for the clarification.
OK. I am wrong. I went back to check it again. I had to take a picture and zoom in to see it. Apparently my eyes deceived me because in the picture you can clearly see that the centerline (top of the pin) falls just outside of the Shopsmith miter gauge for pin position "6". Also, there is no 6" aluminum bar in my MiterSet Segments case, but there is one in the MiterSet Standard, however this bar is for setting half degree angles so it sounds like there was a different flat bar that was supposed to be included in the MiterSet Segments. Mine didn't come with it though. Looks like the only real option to do what the OP wants is to use the MiterSet Segments with an extension fence on the Shopsmith miter gauge.
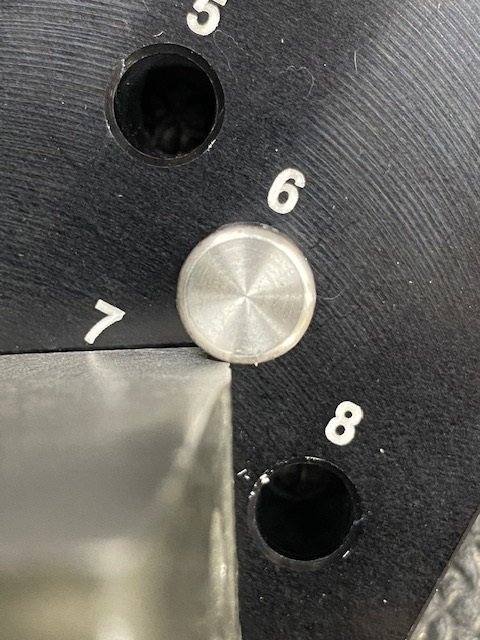
edflorence
Great picture, RFGuy. It clearly shows the need for the "6”
aluminum bar for the Shopsmith version" mentioned in the manual. Sounds like maybe some of the Shopsmith versions got shipped without it.
As for the "slop", I double checked my Standard Miter Set and found that my gray miter gauge fits with no discernible movement. There is a gap that appears on one side between the bar and the slot near the upper end of the slot and this gap extends back maybe an inch and a half or so. I could barely get the tip of an .003" feeler in it. No gap on the other side of the bar, and no "wiggle" at all in the fit.
Maybe the OP has a couple of issues going on: 1) as mentioned early on in this thread, maybe he is using a MiterSet that is not the Shopsmith Version. The box for the one I have is clearly marked as being the Shopsmith version. This would explain the poor fit. 2) Missing the 6" bar. But, as noted, a flat extension bolted to the miter gauge should work.
