
Wow.
After some of my long absences I do not even attempt to catch up what happen while I was gone. Thus the last posts here I had not seen until tonight when I went searching for this post.
I haven't really attempted to explain some of my absences as they were personal in nature but I feel perhaps I should have give more details.
My father in law had been living at his home in the UP of MI on his own and doing fine until about a year and 3/4 ago. It was never quite clear what happened but clearly something happened, despite being hospitalized and being checked they never did decide what was going on. Some of that just seems to be normal when people are in their 90's.
My wife and I live 400 miles away and his other daughter 500 miles away so it seem best if moved to a nursing home to "recover". It wasn't too much of a surprise that instead of that conditions went the other way. I'm not going to go into details but with the medications and effects of the "prime event" left him a far different person then I had know for the last 43 years.
We were making trips and dealing with issues as was his other daughter from her end. This provide a bit more drama and effort then I care for in my life but you have to do what you have to do.
Then this past summer he began the final ups and downs of end of life. We knew the end was near but he would be down then fight back only to go back down again. We were thankful when he found peace towards the end of Sept, about 6 weeks short of being 96.
So that is the reason I've here and then gone again and back again. It is all part of life.
Nothing need be said as reply's as I'm not telling you this looking for condolences, just giving you the facts.
Ed
Fun/Workmate/restoring tubes/waxing/thanks
Moderator: admin
-
JPG

- Platinum Member
- Posts: 35598
- Joined: Wed Dec 10, 2008 7:42 pm
- Location: Lexington, Ky (TAMECAT territory)
Now then, About the 'beta' testing!:D
My mind is made up, but I feel they chose a good 'tester'!:) A bit careless with his camera perhaps.")
Sorry, I just hadda say those things!;)
My mind is made up, but I feel they chose a good 'tester'!:) A bit careless with his camera perhaps.
Sorry, I just hadda say those things!;)
╔═══╗
╟JPG ╢
╚═══╝
Goldie(Bought New SN 377425)/4" jointer/6" beltsander/12" planer/stripsander/bandsaw/powerstation /Scroll saw/Jig saw /Craftsman 10" ras/Craftsman 6" thicknessplaner/ Dayton10"tablesaw(restoredfromneighborstrashpile)/ Mark VII restoration in 'progress'/ 10E[/size](SN E3779) restoration in progress, a 510 on the back burner and a growing pile of items to be eventually returned to useful life. - aka Red Grange
-
knottythumbs
- Silver Member
- Posts: 16
- Joined: Sun Nov 23, 2008 10:06 pm
- Location: FL
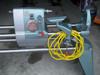
How about a summery, I use Nova G3 chuck with tape on the tube so it was not metal to metal contact with the chuck jaws, I also put tape as a reference to show how deep in the chuck the tube was. If tube would have started to work its way out I could visually see that and save myself some fun playing with a loose tube.knottythumbs wrote:Great Post. Please share details of how it's clamped and materials/process used to get these great tubes
The "tail stock" I think I went in to enough detail on but it is just a old piece of plywood with a "V" notch and lubed with toilet bowl wax.
For the sanding I used scraps of emery like sandpaper in a downwards direction along the top of the tube, running from tail stock to headstock. The shopsmith was running at 700 rpm. If you were to work on the underside it might lift the tube our of the V notch.
I started course and went to fine, I can not tell you grits as these strips had no numbers on them. I made no attempt to reduce the tube size to get all the pits out. I did use a wire brush to clean the pits of rust.
After cleaning the tubes of dust/gunk/rust I then waxed them with J's paste wax a couple of time, used the lathe for that function as well.
Still willing to answer specific questions if you have them.
Ed

I saw on the Forum a picture of someone using a 3X21 belt sander for cleaning caster rods. I quickly found my 3X21 belt sander and starting with course grits worked my way quickly to 220 grit using my Shopsmith tube cleaning Shopsmith. This did a beautiful job in a lot less time.
A caster wheel on each side of the "V" notch might work well. I mounted the caster wheels on each side ot hte tailstock as the 1 3/4" tubes will pass through the eccentric mount hole. I drilled a slotted hole 45 degrees off vertical on each side for the caster wheel bolts. The wheels are adjusted to just allows the tube to clear the tail stock. I mount the caster wheels on the opposite/back side of where the eccentric mount goes into the tailstock so the tail stock is still fully functional. I am unable to do tubes that are bent very much due to excessive vibration at 750 RPM. Sometimes I am able to salvage a MINI tube from the unbent part but most are saved for salvage yard.
Since I have been using Shopsmith headstocks as a replacement for Total Shop and Wood Master headstock (1.675" way tubes) I belt sand until all the pits are removed using the course sandpaper. If I am unable to remove really deep pits, then I put the tube in the salvage yard pile. Not seen a problem doing this and the tubes looks nice when done. I have dozens of tubes to play with.
Can you get internal jaws for the G3 chuck or can they be turned around? I used the internal jaws on my 3" metal chuck and never had a tube come loose while turning.
reible wrote:How about a summery, I use Nova G3 chuck with tape on the tube so it was not metal to metal contact with the chuck jaws, I also put tape as a reference to show how deep in the chuck the tube was. If tube would have started to work its way out I could visually see that and save myself some fun playing with a loose tube.
The "tail stock" I think I went in to enough detail on but it is just a old piece of plywood with a "V" notch and lubed with toilet bowl wax.
For the sanding I used scraps of emery like sandpaper in a downwards direction along the top of the tube, running from tail stock to headstock. The shopsmith was running at 700 rpm. If you were to work on the underside it might lift the tube our of the V notch.
I started course and went to fine, I can not tell you grits as these strips had no numbers on them. I made no attempt to reduce the tube size to get all the pits out. I did use a wire brush to clean the pits of rust.
After cleaning the tubes of dust/gunk/rust I then waxed them with J's paste wax a couple of time, used the lathe for that function as well.
Still willing to answer specific questions if you have them.
Ed
Bill Mayo bill.mayo@verizon.net
Shopsmith owner since 73. Sell, repair and rebuild Shopsmith, Total Shop & Wood Master headstocks, SPTs, attachments, accessories and parts. US Navy 1955-1975 (FTCS/E-8)
Shopsmith owner since 73. Sell, repair and rebuild Shopsmith, Total Shop & Wood Master headstocks, SPTs, attachments, accessories and parts. US Navy 1955-1975 (FTCS/E-8)
-
robinson46176

- Platinum Member
- Posts: 4182
- Joined: Mon Mar 09, 2009 9:00 pm
- Location: Central Indiana (Shelbyville)
billmayo wrote: If I am unable to remove really deep pits, then I put the tube in the salvage yard pile.
Those tubes have really great tone... Would make a really great set of big wind chimes.
.
--
farmer
Francis Robinson
I did not equip with Shopsmiths in spite of the setups but because of them.
1 1988 - Mark V 510 (bought new), 4 Poly vee 1 1/8th HP Mark V's, Mark VII, 1 Mark V Mini, 1 Frankensmith, 1 10-ER, 1 Mark V Push-me-Pull-me Drillpress, SS bandsaw, belt sander, jointer, jigsaw, shaper attach, mortising attach, TS-3650 Rigid tablesaw, RAS, 6" long bed jointer, Foley/Belsaw Planer/molder/ripsaw, 1" sander, oscillating spindle/belt sander, Scroll saw, Woodmizer sawmill
-
knottythumbs
- Silver Member
- Posts: 16
- Joined: Sun Nov 23, 2008 10:06 pm
- Location: FL
Thanks, here's my attempt
I couldn't find the plug Mr. Mayo used but managed to manufacture a usable plug. Here's some photos. My plug looks a little weathered after 4 tubes but is ready for the next 4 on my other SS.
- Attachments
-
- IMAG0267-001.jpg (85.63 KiB) Viewed 2749 times
-
- IMAG0278-001.jpg (106.7 KiB) Viewed 2749 times
-
- IMAG0277-001.jpg (100.83 KiB) Viewed 2747 times
-
- Test plug used for tube refinishing.jpg (9.85 KiB) Viewed 2746 times
Knottythumbs