Personally, I don't have a drill bit long enough to drill all the way through a blank.
I drill from the center cut to ensure the holes are lined up and the grain matches.
I usually mark the blank with a permanent marker and place arrows toward the center so I know where to drill.
There a couple of reasons for cutting the blank longer than the tube. Blow outs during drilling are not uncommon, especially near the end of the tube. Also remember that the ends of the blank need to be squared to the tube and you you need some meat there to square. Most people use a pen mill to square the blank ends to the tube. I use a 1/4" rod in my drill chuck and use the disc sander. For best results, turn the eccentric towards the front of the machine so it is 90 degrees off center, this puts the blank on the inside of the sanding disc. Place the tubed blank on the rod, and sand the end of the blank so it is square to the tube. Just how I do it rather than a pen mill.
Started on my first pen
Moderator: admin
-
terrydowning

- Platinum Member
- Posts: 1678
- Joined: Mon Jul 19, 2010 3:26 pm
- Location: Windsor, CO

The next steps and then the pen.
I opted to sand the blanks to size. To do this I cut a small section of 1/4" CRS then used the miter gauge to mount it.
This is what it looked like at the start.
[ATTACH]16002[/ATTACH]
[ATTACH]16003[/ATTACH]
Made sure the rod would not come into contact with the sanding disk.
Sanding was done with the quill feed and the blank held in place. It seemed to work best at the middle top, anyway that was what I found.
[ATTACH]16004[/ATTACH]
Basic turning and sanding were next. Once it was shaped and smooth I did a simple finish.
[ATTACH]16005[/ATTACH]
Pressed the parts together. One problem was when I was trying to put the pen tip in place, it just would not fit. I sanded a relief on the tip and used a a larger drill bit to help get it started. It finally went in but now there are 3 very small cracks in the wood. Going to have to look at this before I do another.
The press worked well, except for the pin tip issue.
[ATTACH]16006[/ATTACH]
Next post, the pen.
Ed
I opted to sand the blanks to size. To do this I cut a small section of 1/4" CRS then used the miter gauge to mount it.
This is what it looked like at the start.
[ATTACH]16002[/ATTACH]
[ATTACH]16003[/ATTACH]
Made sure the rod would not come into contact with the sanding disk.
Sanding was done with the quill feed and the blank held in place. It seemed to work best at the middle top, anyway that was what I found.
[ATTACH]16004[/ATTACH]
Basic turning and sanding were next. Once it was shaped and smooth I did a simple finish.
[ATTACH]16005[/ATTACH]
Pressed the parts together. One problem was when I was trying to put the pen tip in place, it just would not fit. I sanded a relief on the tip and used a a larger drill bit to help get it started. It finally went in but now there are 3 very small cracks in the wood. Going to have to look at this before I do another.
The press worked well, except for the pin tip issue.
[ATTACH]16006[/ATTACH]
Next post, the pen.
Ed
- Attachments
-
- DSCF2893sc.jpg (115.68 KiB) Viewed 2209 times
-
- DSCF2892sc.jpg (88.26 KiB) Viewed 2209 times
-
- DSCF2891sc.jpg (93.79 KiB) Viewed 2210 times
-
- DSCF2894sc.jpg (82.36 KiB) Viewed 2208 times
-
- DSCF2895sc.jpg (101.75 KiB) Viewed 2206 times
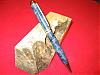
Looks like the wife adopted the pen. She is using it to writer her sister a note/letter.
I'm reasonably happy with it.
And now the picture,
[ATTACH]16007[/ATTACH]
************************
As to the "blue tape" you just didn't check my post quickly enough, the uncensored images were up for a while until I noticed and "fixed" them.
This is NOT a shopsmith project but I am doing testing on something. If the weather stays warm you might see it before long.
Ed
I'm reasonably happy with it.
And now the picture,
[ATTACH]16007[/ATTACH]
************************
As to the "blue tape" you just didn't check my post quickly enough, the uncensored images were up for a while until I noticed and "fixed" them.
This is NOT a shopsmith project but I am doing testing on something. If the weather stays warm you might see it before long.
Ed
- Attachments
-
- IMG_1857sc.jpg (111.24 KiB) Viewed 2208 times
-
terrydowning
- Platinum Member
- Posts: 1678
- Joined: Mon Jul 19, 2010 3:26 pm
- Location: Windsor, CO
Very nice pen, Ed.
Since I use a pen mill, I only cut the blanks about 1/32" oversize. That way there's not much to trim away. The only time I'd cut them longer is if I was having a problem with the drill bit causing some blow out as the bit passes through the end of the blank. Blow out can be a problem with some things like acrylic, so it's best to use longer blanks, stop the bit before it comes through the end of the blank, and then trim off the excess to expose the hole.
Since I use a pen mill, I only cut the blanks about 1/32" oversize. That way there's not much to trim away. The only time I'd cut them longer is if I was having a problem with the drill bit causing some blow out as the bit passes through the end of the blank. Blow out can be a problem with some things like acrylic, so it's best to use longer blanks, stop the bit before it comes through the end of the blank, and then trim off the excess to expose the hole.
Art in Western Pennsylvania
-
terrydowning
- Platinum Member
- Posts: 1678
- Joined: Mon Jul 19, 2010 3:26 pm
- Location: Windsor, CO
Most pen kit instructions are on the safe/conservative side and want the customer to succeed at making a pen.
Scratching the tubes before gluing is a prime example. I don't sand tubes anymore, I just wipe 'em down with alcohol to remove any grease/oil that may prevent glue from sticking.
Length of blank to cut is another example. The instructions will tell you to cut the blank 1/8" to 1/4" longer than the tube. This is to account for blowout, off center drilling, squaring etc. The pen kit manufacturer has no way of knowing your tools, proficiency with those tolls etc. So they prepare the instructions so novice users can perform the steps.
The instructions are guidelines to make a pen, they are not laws etched in stone. After doing several hundred kit pens, there are some steps I skip altogether. I have also modified assembly instructions in some cases. Usually to do with production manufacturing of dozens of pens. The instructions are designed for 1 pen at a time.
By and large you just have to figure out what works best for you. When in doubt, read and follow the instructions, they are geared towards success.
Scratching the tubes before gluing is a prime example. I don't sand tubes anymore, I just wipe 'em down with alcohol to remove any grease/oil that may prevent glue from sticking.
Length of blank to cut is another example. The instructions will tell you to cut the blank 1/8" to 1/4" longer than the tube. This is to account for blowout, off center drilling, squaring etc. The pen kit manufacturer has no way of knowing your tools, proficiency with those tolls etc. So they prepare the instructions so novice users can perform the steps.
The instructions are guidelines to make a pen, they are not laws etched in stone. After doing several hundred kit pens, there are some steps I skip altogether. I have also modified assembly instructions in some cases. Usually to do with production manufacturing of dozens of pens. The instructions are designed for 1 pen at a time.
By and large you just have to figure out what works best for you. When in doubt, read and follow the instructions, they are geared towards success.
--
Terry
Copy and paste the URLs into your browser if you want to see the photos.
1955 Shopsmith Mark 5 S/N 296860 Workshop and Tools
https://1drv.ms/i/s!AmpX5k8IhN7ahFCo9VvTDsCpoV_g
Public Photos of Projects
http://sdrv.ms/MaXNLX
Terry
Copy and paste the URLs into your browser if you want to see the photos.
1955 Shopsmith Mark 5 S/N 296860 Workshop and Tools
https://1drv.ms/i/s!AmpX5k8IhN7ahFCo9VvTDsCpoV_g
Public Photos of Projects
http://sdrv.ms/MaXNLX

Ed the reasoning for the extra 1/4" is to allow for squaring the blanks after the tubes are inserted and dry. Last week I invited my brother over for some pen blank cutting, drilling, gluing, squaring and turning. He was having some issues making everything work properly at home. After cutting blanks and attempting to drill them I noted his holes started fine but were not square at the bottom end. I also noted brother was leaning on the front edge of the table (yeah he is a really big guy, in fact he calls himself the big brother, even though I am three years his elder). I squared the table to the drill bit using a machinists square, and we started over. Fortunately we were still able to square the blanks and use them. Those that were drilled after adjustments were better but few were imperfect. I apologize to those who do not like the barrel trimmers. I do like them because they are inserted into the brass tube which tends to accomplish two things. first the bit that runs thru the tube cleans out any glue that makes its way in side. Secondly having that bit in the tube assures that the grinding of the wooden blank is in fact square to the brass tube. Again I say sorry guys I know some of your are smarter and more efficient than I am. Jim
F. Jim Parks
Lakewood, Colorado:)
When the love of power is replaced by the power of love the world will have a chance for survival.
Lakewood, Colorado:)
When the love of power is replaced by the power of love the world will have a chance for survival.
Fjimp, to my thinking, there is no more accurate way than using a pen mill to square the ends of pen blanks, and as you point out, the mill also removes glue inside the tubes. That's a winning combination in pen making. The only thing other methods can do at best is match the ability of the pen mill. With any method other than the pen mill, you must be meticulous in your approach to ensuring the end of the blank is perpendicular to the tube. With some of the larger bodied pens, not squaring the ends accurately is quite noticeable on the finished pen. With the pen mill, it a no brainer. I've made pens since 1995 and wouldn't think of making one without using a pen mill, but that's not to say that others methods aren't acceptable.
Art in Western Pennsylvania
-
RobertTaylor
- Platinum Member
- Posts: 569
- Joined: Mon Sep 03, 2007 9:28 am
- Location: North Canton, Ohio
finished pen
Well done Ed. That is a beautiful pen indeed.
Bob
1954 greenie, 1963 anniversary edition now a mini,
1984 500, 1985 510, 1987 510, pro-planer, bandsaw, dust collector
1954 greenie, 1963 anniversary edition now a mini,
1984 500, 1985 510, 1987 510, pro-planer, bandsaw, dust collector
Ed,
First off I agree the pen is beautiful. I predict you are now hooked.
Well everyone knows you folks are far more experienced than I am. The first pen mill I purchased was a joke. No I do not remember where I bought it. I guess I will need to try another one. From which vendor are you purchasing them. Jim
First off I agree the pen is beautiful. I predict you are now hooked.
Well everyone knows you folks are far more experienced than I am. The first pen mill I purchased was a joke. No I do not remember where I bought it. I guess I will need to try another one. From which vendor are you purchasing them. Jim
F. Jim Parks
Lakewood, Colorado:)
When the love of power is replaced by the power of love the world will have a chance for survival.
Lakewood, Colorado:)
When the love of power is replaced by the power of love the world will have a chance for survival.