So Ive been toying with the idea of stepping down the rpms of the bandsaw to cut metal. The bandsaw will NOT even try and cut metal at 700 rpm especially with a wood blade. It has to be geared down. This setup will get you into the sub 200 range. You can then use a bi-metal blade and cut your heart out.
Why? Who knows at this point. I started out making furniture and now I'm on to other crap all of it somehow justified with my original intent, making furniture. So referencing this thread:
http://www.shopsmith.net/forums/showthr ... lternative
I went off to acquire the parts.
I needed
2-2 inch v belt pulleys
2-7inch pulleys
1-mandrel or axel and 2 pillow blocks
[ATTACH]17066[/ATTACH]
[ATTACH]17067[/ATTACH]
[ATTACH]17068[/ATTACH]
[ATTACH]17065[/ATTACH]
This would all attach to the board shown later which drops below the bench tubes.
Metal cutting on bandsaw. Mods and data
Moderator: admin
Metal cutting on bandsaw. Mods and data
- Attachments
-
- axel.JPG (53.86 KiB) Viewed 10975 times
-
- 2 inch pulley label.JPG (51.58 KiB) Viewed 10950 times
-
- 7 inch pulley label.JPG (52.16 KiB) Viewed 10959 times
-
- mandrel.JPG (51.3 KiB) Viewed 10966 times
So what next..
The old diagram shows to drop a board below the bench tubes which will also allow you to tension the belts.
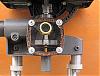
Here's a mockup. The sequence is a 2 inch pulley on the headstock to a 7 inch. The 7 inch is on shaft with a 2 inch, back to a 7 on the bandsaw.
Here's a mockup of the lower jackshaft. The things on the top of the pillow blocks? Yes those are oilers. A few drops of machine oil and these things will spin forever.
[ATTACH]17069[/ATTACH]
Up to the pulleys on the headstock and bandsaw.
[ATTACH]17070[/ATTACH]
Shot of the hole spacing. Now the board is held to the bench tube by 2 exhaust clamps. Not tightened tight, but left loose to allow the board to drop away or swing up.
[ATTACH]17071[/ATTACH]
Last is the ground section on the right which was ground to accept the 7 inch on the mandrel with the 2 inch.
The old diagram shows to drop a board below the bench tubes which will also allow you to tension the belts.
Here's a mockup. The sequence is a 2 inch pulley on the headstock to a 7 inch. The 7 inch is on shaft with a 2 inch, back to a 7 on the bandsaw.
Here's a mockup of the lower jackshaft. The things on the top of the pillow blocks? Yes those are oilers. A few drops of machine oil and these things will spin forever.
[ATTACH]17069[/ATTACH]
Up to the pulleys on the headstock and bandsaw.
[ATTACH]17070[/ATTACH]
Shot of the hole spacing. Now the board is held to the bench tube by 2 exhaust clamps. Not tightened tight, but left loose to allow the board to drop away or swing up.
[ATTACH]17071[/ATTACH]
Last is the ground section on the right which was ground to accept the 7 inch on the mandrel with the 2 inch.
- Attachments
-
- mockup.JPG (45.58 KiB) Viewed 11010 times
-
- 7inch on bandsaw.JPG (52.43 KiB) Viewed 11013 times
-
- hole layout.JPG (44.81 KiB) Viewed 10950 times
-
- axel ground.JPG (42.33 KiB) Viewed 10327 times
So now you have tried to space the jackshaft on the wooden board. Make sure the jackshaft is centered when the tension is applied. I have some measurements coming up that will allow you to work off mine if you want. If the jackshaft is not centered the belts will ride the bench tubes.
You will need 2 belts. Here is the belt size you need:
[ATTACH]17073[/ATTACH]
Belts bough off ebay seller compressor-source for 9 bucks each.
You should start to look like this
[ATTACH]17074[/ATTACH]
Now to tighten the board I made a wedge that fits between the bench tube and board. This tightens the belts. You will have to play with your setup and I will get around to pics of mine shortly.
[ATTACH]17075[/ATTACH]
Finally the whole rig.
[ATTACH]17076[/ATTACH]
- Attachments
-
- belt size needed.JPG (47.57 KiB) Viewed 10960 times
-
- initial hookup.JPG (51.08 KiB) Viewed 10935 times
-
- wedge.JPG (44.85 KiB) Viewed 10949 times
-
- whole thing.JPG (51.31 KiB) Viewed 10933 times
-
brad_nalor
- Gold Member
- Posts: 131
- Joined: Thu Oct 20, 2011 1:51 am
-
JPG

- Platinum Member
- Posts: 35600
- Joined: Wed Dec 10, 2008 7:42 pm
- Location: Lexington, Ky (TAMECAT territory)
brad_nalor wrote:They now have a very simple kit to fit the model 10ER and direct drive at the rear of the headstock with speed changer down to almost 200 rpm. Its shown with the bandsaw.
I think the formula is FPM=.2618 x D (in this case use whatever the shopsmith bandsaw wheel is) x RPM
And who would 'they' be?
╔═══╗
╟JPG ╢
╚═══╝
Goldie(Bought New SN 377425)/4" jointer/6" beltsander/12" planer/stripsander/bandsaw/powerstation /Scroll saw/Jig saw /Craftsman 10" ras/Craftsman 6" thicknessplaner/ Dayton10"tablesaw(restoredfromneighborstrashpile)/ Mark VII restoration in 'progress'/ 10E[/size](SN E3779) restoration in progress, a 510 on the back burner and a growing pile of items to be eventually returned to useful life. - aka Red Grange
-
paulmcohen
- Platinum Member
- Posts: 1578
- Joined: Fri Dec 08, 2006 8:10 pm
- Location: Beaverton, Oregon
- Contact:
If anyone has a Shopsmith Speed Reducer it works with the bandsaw, instructions were provided with mine when I purchased it and Nick did a video on it as well.
Paul Cohen
Beaverton, OR
A 1982 500 Shopsmith brand upgraded to a Mark 7 PowerPro, Jointer, Bandsaw (with Kreg fence), Strip Sander, Ring Master and lots of accessories all purchased new
12" Sliding Compound Mitre Saw, 1200 CFM DC
Beaverton, OR
A 1982 500 Shopsmith brand upgraded to a Mark 7 PowerPro, Jointer, Bandsaw (with Kreg fence), Strip Sander, Ring Master and lots of accessories all purchased new
12" Sliding Compound Mitre Saw, 1200 CFM DC
Yeah, I was aware the speed reducer could be used on the other end...but me no have. Like I said last night, I have the rpm to fpm conversions and found a chart to post here for others so they don't have to do the homework. JPG has already done some math in the post referenced so I'll just consolidate when I get home today.
I also have action shots and some tips.
I also have action shots and some tips.
-
brad_nalor
- Gold Member
- Posts: 131
- Joined: Thu Oct 20, 2011 1:51 am