
Thanks Mike for the book and videos suggestions. I have watched and re-watched some of the videos before embarking on this project. And I got the book "Powertool Woodworking for Everyone", which I have enjoyed. It's a later edition. I can see where it will be awhile before I get to enjoy using this machine. Mostly I plan to use it as a lathe and since I know nothing about turning I'll have plenty of questions and homework to do. I'll look at the study course too-but first things first...
TC
green and/or gray
Moderator: admin
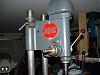
Some decisions await. Primer and a light coat of green went on the aluminum casting just before dusk. I had lot of trouble with the can spitting. I've used lots of rustoleum and never had this happen. I don't know if it was the can or my technique to blame. Hope to have this solved before the final coat goes on. next up will be the legs- they'll get a light sanding prime and paint. No intention to take them to bare metal. So while the castings dry..
[ATTACH]17130[/ATTACH]
I've moved to the mechanicals, much more fun, here's the headstock stripped:
[ATTACH]17131[/ATTACH]
I used to think the rubber mallet was the best go to tool for taking things apart but in this project the heat gun was the hero. It's conquered five difficult tasks already- removing the quill and drive shaft being the most recent. Hail the conquering heroes:
[ATTACH]17132[/ATTACH]
I just about talked myself into cutting an access hole into this headstock. Usually I don't care to modify things but this is a maintence thing- it'll get lubed more often if its easy to do. Also plan to drill the oil holes for the sheeves. For the access hole I'm thinking to drill a pilot hole and use this hole cutter:
[ATTACH]17133[/ATTACH]
The idea is this will go in an old Rockwell radial arm drill press positioned close to a bench where I'll secure the headstock. I should be able to find the right angle to drill a pilot hole and then use this hole bit. Never used one of these for metal before. I have a set of these on hand and the 3 inch one has never been used. Feel free to talk me into or out of this plan, my finger's gettin ichy for the trigger though.
While I'm at it I'm thinking some other upgrades might be in order. I could go to the Poly v belt by robbing the other shopsmith- I'm not sure about this. Do I want to get away from the Gilmer? Also I'm thinking to go to a two bearing quill. Is anyone re-building these? I figure to take my old bearings to McGuire bearing here in Portland. I like to go local when the price is even halfway reasonable. I can do one headstock at a time, and for budgetary reasons pretty much have to. When I start adding up belts and bearings for two machines it starts to make sense to spread the cost out, especially at tax time. My techniques improves with practice also, so the second machine will go faster.
all for now and back to work
TC
- Attachments
-
- 1-DSCN0683.JPG (83.91 KiB) Viewed 2055 times
-
- 1-DSCN0682.JPG (72.85 KiB) Viewed 2050 times
-
- 1-DSCN0684.JPG (58.28 KiB) Viewed 2049 times
-
- 1-DSCN0686.JPG (78.55 KiB) Viewed 2047 times
The holesaw should do the trick. A couple of years ago when re-modelling the kitchen I had to cut a new hole in a cast iron waste pipe (while under the floorboards).
I used an electric hand drill & a holesaw - the term "Bi-Metal" springs to mind but aluminium may not need that.
Low speed & lots of spray on oil to keep it cool got the job done. Patience is the key - don't rush it!
Best of luck!:)
I used an electric hand drill & a holesaw - the term "Bi-Metal" springs to mind but aluminium may not need that.
Low speed & lots of spray on oil to keep it cool got the job done. Patience is the key - don't rush it!
Best of luck!:)
not to get off the original posting subject, but since you mentioned holesaw,
Is there a holesaw made for masonry?
Is there a holesaw made for masonry?
www.wirewerkes.com
Hiding in a Joshua Tree.
Hiding in a Joshua Tree.
-
judaspre1982
- Platinum Member
- Posts: 1237
- Joined: Tue Jul 08, 2008 10:10 pm
========================
Last edited by judaspre1982 on Thu Apr 27, 2017 5:06 pm, edited 1 time in total.
I bought this for cutting through 2 layers of brick on the wall of the house to fit an extractor fan; the better weather is coming so I might actually get round to doing it soon! ")
[ATTACH]17144[/ATTACH]
Those spaced out cutting teeth seem to be the hallmark of heavy duty masonry saws. The good holesaws are expensive but for a one off job I'm sure this cheap Chinese product will do the job. You should be able to find something similar in the US. This one came with 2 saw sizes, the pilot drill & the extension shaft which should be useful as I've got about 12" to go through. Just fit it to an SDS drill & off you go.
And now I want to know if TC's itchy fingers have got the better of him - is there a new hole in the old '55?
- Attachments
-
- holesaw.jpg (86.78 KiB) Viewed 2142 times
We have an access hole. Most of the time it took was spent figuring out how to position the head stock. I was going to swing the drill over my bench, that turned out to be too tall, and when I swung the drill press table out of the way the bit wouldn't reach. I threw some plywood down, braced and clamped all and it looked like this:
[ATTACH]17217[/ATTACH]
This for me was a make it or break type situation.Drilling the pilot hole went fine- used a couple of progressively bigger bits then the hole saw. It was super loud. You could see the headstock visibly deform when the hole saw started to cut, and I had to reset one the clamps after a short while. That might have been the cheap clamps vibrating loose. Here's the cut:
[ATTACH]17218[/ATTACH]
It came out OK, not perfectly centered. If I was going to do this again I might have gotten better precision if I has drilled the pilot hole up to the same diameter of the hole saw's pilot- so that part of the bit had less to do- also bracing the headstock internally to reduce the flex- it looked to be a good 1/16" maybe even. Using the cheap bit didn't help any either- a better quality bi-metal type might give a better result. Using a 3" hole saw you don't have a lot of wiggle room- if you intend to retain the fang to support the logo plate. Here's the results:
[ATTACH]17219[/ATTACH]
Will now use a small grinder bit on the foredom rotary tool to take the burr off- that should happen tomorrow, plus prime and paint. A productive and educational day.
cheers
TC
- Attachments
-
- 1-DSCN0699.JPG (89.18 KiB) Viewed 2067 times
-
- 1-DSCN0701.JPG (84.75 KiB) Viewed 2068 times
-
- 1-DSCN0702.JPG (64.95 KiB) Viewed 2065 times

Headstock A Logo Access Hole
I found a 3 1/8" hole saw will still leave room for the logo cover to cover the hole. I drilled a hole in the top and bottom half moons and used #10 screws into a straight bracket to hold the logo cover.
Since the casing is much thicker, I rounded the inside of the headstock casing hole to prevent cutting my hand when inserting it into the headstock casing.
Since the casing is much thicker, I rounded the inside of the headstock casing hole to prevent cutting my hand when inserting it into the headstock casing.
Bill Mayo bill.mayo@verizon.net
Shopsmith owner since 73. Sell, repair and rebuild Shopsmith, Total Shop & Wood Master headstocks, SPTs, attachments, accessories and parts. US Navy 1955-1975 (FTCS/E-8)
Shopsmith owner since 73. Sell, repair and rebuild Shopsmith, Total Shop & Wood Master headstocks, SPTs, attachments, accessories and parts. US Navy 1955-1975 (FTCS/E-8)
Bill
I already had a 3" cutter on hand so I figured I give it a whirl. Normally I'd jump on any excuse to buy new tools, but for the time being I'm sticking with what's on hand as we're tight on the budget. Also I'm avoiding drilling the logo plate if possible, but that will be my fallback position.
TC
I already had a 3" cutter on hand so I figured I give it a whirl. Normally I'd jump on any excuse to buy new tools, but for the time being I'm sticking with what's on hand as we're tight on the budget. Also I'm avoiding drilling the logo plate if possible, but that will be my fallback position.
TC