Cleaning and maintaining the Table
Moderator: admin
Cleaning and maintaining the Table
Where do I find info on the correct way to clean and maintain the cast aluminum table on the Mark V 510?
-
paulmcohen
- Platinum Member
- Posts: 1578
- Joined: Fri Dec 08, 2006 8:10 pm
- Location: Beaverton, Oregon
- Contact:
cadman84 wrote:Where do I find info on the correct way to clean and maintain the cast aluminum table on the Mark V 510?
Search the forum for "video" if you want to purchase an excellent video, search "wax" if you want to read the debate on the best coating for the table. Of check out Nick's sawdust sessions where he has several maintenance topics.
http://www.shopsmithacademy.com/Sawdust_Sessions.htm
Short answer wax the table after using a black/gray synthetic pad to clean it.
Paul Cohen
Beaverton, OR
A 1982 500 Shopsmith brand upgraded to a Mark 7 PowerPro, Jointer, Bandsaw (with Kreg fence), Strip Sander, Ring Master and lots of accessories all purchased new
12" Sliding Compound Mitre Saw, 1200 CFM DC
Beaverton, OR
A 1982 500 Shopsmith brand upgraded to a Mark 7 PowerPro, Jointer, Bandsaw (with Kreg fence), Strip Sander, Ring Master and lots of accessories all purchased new
12" Sliding Compound Mitre Saw, 1200 CFM DC
Hi, Andy (cadman84)! - Would you mind posting a full picture of you avatar? It looks like a beautiful bassinet and cradle,  I for one would like to see a bigger picture. Is this one of your projects?
Congratulations to both you and your wife on your new baby girl!
Congratulations to both you and your wife on your new baby girl!
Octogenarian's have an earned right to be a curmudgeon.
Chuck in Lancaster, CA
Chuck in Lancaster, CA
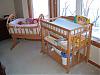
Hi Chuck, I have attached a few pictures of the first two pieces of what will be a four piece set for the baby’s room. Everything was made in my shop with my Mark V 500. These are the first real pieces of furniture I have ever built. I never had the time to dedicate to it until we finished and sold our old fixer upper home and moved into an almost new house. There were many arguments about the baby’s lungs growing up in a perpetual dust storm of sawdust and drywall dust. As you can see my wife won as always.
Piece #1 the cradle I made by taking a few basic dimensions from a plan in Wood magazine. The rest was based of a picture I found online and my imagination. I ended up using pivot hinges from Rockler and bed bolt covers from Horton Brass to make it rock and an old church key in a hole drilled in the end to lock it horizontal. I must say the most fun was the mortise and tenon connections at an angle. Since I have minimal experience I tested it by putting both our Beagles in it (about 80lb in total. Did I mention I work for a German Engineering company:) ) It passed the test with no problem. The project took me about 2 months of weekends and some nights after work.
I haven't taken my lathe duplicator out of the box yet so I opted for 1/2" thick by 3/4" wide stock rounded over for the slats. The wide openings between the slats were a conscious decision based on the cradle is only used with bumpers otherwise I would have followed the requirements for a crib.
Piece #2 The changing table came from going with my wife to BabiesRus and saying I can make that from some scrap and a sheet of plywood. I just did one of those it's about this deep by about that long and as my wife is 5 foot even everything I make ends up a bit shorter than they sell in the store. Since I had already purchased the plans for a crib from Rockler I incorporated the slats from the cradle around the top and the slats from the crib on the lower side sections.
Piece #3 is the crib. It's still in the shop dry fitted together. I think I can get one to two more months out of the cradle so I shouldn't have any problems finishing it in time. By the way the crib is one of those transitional beds that should last until she is a least a teenager I hope.
Piece #4 will be a dresser. We have an odd dresser that we are using until I finish this project so there is no pressure right now. Actually I haven't thought too much about it yet. I may try to incorporate the crib slats into the sides to tie everything together. I've never made drawers so I see more research in my future.
Hope you enjoy the pictures.
Andy
- Attachments
-
- changing table 2.jpg (29.65 KiB) Viewed 11687 times
-
- changing table 1.jpg (45.47 KiB) Viewed 11681 times
-
- changing table 3.jpg (29.65 KiB) Viewed 11683 times
-
- cradle 1.jpg (53.57 KiB) Viewed 11682 times
-
- cradle 3.jpg (49.42 KiB) Viewed 11678 times
Really nice work, Andy! I love the joinery and the well designed smooth curves throughout! Nice finish also! Very impressive - especially for an engineer. Now you'll have to start thinking about duplicating these things plus another dresser for your next bundle of joy!
Octogenarian's have an earned right to be a curmudgeon.
Chuck in Lancaster, CA
Chuck in Lancaster, CA
-
a1gutterman

- Platinum Member
- Posts: 3653
- Joined: Tue Jan 09, 2007 12:45 am
- Location: "close to" Seattle
