My Version of a Performax

This is a forum for intermediate to advanced woodworkers. Show off your projects or share your ideas.

Moderator: admin

gr8mesquite
Gold Member
Posts: 95
Joined: Sat Jul 23, 2011 6:39 pm
Location: Tucson, AZ.

My Version of a Performax

Post by gr8mesquite »

Ten years ago when I moved into my new house in Tucson, there were lots of grande woodworking projects to tackle. Headboards, cabinets, chests-of-draws, etc. in southwest design were new and exciting to me. But alas, at some point you run out of room for new furniture, and carrying an armoire or other large pieces to someone's house as a hostess gift is tricky. So...I got into smaller things like cutting boards and segmented stuff, and I've coveted a Performax like thickness sander ever since my first segmented class at Woodcraft. Next problem--not enough floor space in my garage for lots of stand alone tools. The Shopsmith and a few other necessities are all I can manage. So...I became obsessed with creating yet another adaptation of my Shopsmith--a thickness sander.

[ATTACH]22165[/ATTACH]

Above I show a 2.5" diameter piece of PVC which is 17" long. I cut some wooden disks for support, lathered them with glue and jammed them in, predrilled at 1/2" for the axelrod.


[ATTACH]22166[/ATTACH]
I put stop collars on both sides, which I drilled, for screwing into the end disks.

[ATTACH]22167[/ATTACH]

I got some 3" self stick Velco on Ebay (about $15), and wrapped the PVC. I also got a pillow bearing at the local bearing store ($12) where I got the axelrod ($5.)
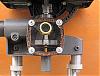
A piece of MDF acts as the sanding table, and inset (underneath) into the MDF are a pair of Shopsmith table tubes for height adjustment. I got the tubes from a SS Forum member for about $30 delivered (thanks.)

[ATTACH]22168[/ATTACH]

I made a dust cover and drilled a hole on top for my vacuum. It looks primative, but it's a protype and it works great.

I went online and bought 4" wide Velcro loop backed sandpaper @100 grit and 220 grit. The rolls were about $35 each, but I got enough to last me til I leave the planet.

When I cranked it up (at very low rpm's) I ran a piece of wood thru and immediately noticed a slight problem. The wood took off like a javelin and darn near skewered my Honda (seen in the background.:confused: ) The solution is, of course, to come in from the other side, against the rotation. Harder to push, and don't let go--use a wood block as a pusher and a stopper.

Anyway, that's it. Somewhat cumbersome to set up, but once there it works great.

I would greatly welcome any suggestions and constructive criticism. Oh yeah, and by the way--sanding is easier with paper on the roller. When my friend Farley (John) came over for a demo, I forgot to put paper on. :o John tried to be polite and encouraging, despite the fact that no sanding was taking place. A small oversight. We had a great laugh.:D

Jerome
Attachments
_DSC0472.JPG
_DSC0472.JPG (130.1 KiB) Viewed 4158 times
_DSC0468.JPG
_DSC0468.JPG (102.72 KiB) Viewed 4163 times
_DSC0480.JPG
_DSC0480.JPG (132.45 KiB) Viewed 4166 times
_DSC0474.JPG
_DSC0474.JPG (100.5 KiB) Viewed 4157 times
farley
Platinum Member
Posts: 610
Joined: Sat Apr 11, 2009 8:02 pm
Location: Sahuarita, Arizona

Post by farley »

yes did have a laugh about that. sometimes we get moving too fast.

his cutting boards are great. Jerry maybe another thread showing off them.
User avatar
joshh
Platinum Member
Posts: 723
Joined: Tue Jan 08, 2013 8:53 pm
Location: Dallas / Fort Worth, Texas

Post by joshh »

I really like it! Makes me want to build a strip sander and belt sander!
- 1986 Mark V 500 Mini

- 1985 Mark V 510 with reversible motor, bandsaw, jointer, and double-tilt.

I offer quality motor reversal, rebuilding, and rewiring. Contact me at HarbourTools@live.com
User avatar
peterm
Platinum Member
Posts: 576
Joined: Mon Jan 18, 2010 2:52 pm
Location: Dartmouth, NS, Canada

Post by peterm »

Interesting drum sander design Jerome! I like your use of stop collars..ingenious.:)

WRT home made strip sanders, this post might give joshh some ideas:
https://forum.shopsmith.com/viewtopic.php?t=10157

I wrote it up and Machinist Workshop magazine say they intend to publish the article in October (but that timing is not "firm").
Peter
a 510,a Mini, dedicated SS drillpress, SS spt's, home made SS belt grinder, SS piston air system, Southbend 10k lathe, mill/drill, Taig
twoblocked
Gold Member
Posts: 28
Joined: Wed Mar 09, 2011 8:02 am

Post by twoblocked »

Instead of drilled stop collars you can get 5/8 inch x 3-3/4 inch hubs made by Chicago Die Cast. Robot Market Place carries them.
User avatar
Ed in Tampa
Platinum Member
Posts: 5834
Joined: Fri Jul 21, 2006 12:45 am
Location: North Tampa Bay area Florida

Post by Ed in Tampa »

I wonder if a solid wood slug inserted in the pipe would be better than the two end caps?

I'm envisioning a block of wood 17" long drilled and then turned to fit inside the pipe. Or possibly just using the wood without the pipe.

I would be worried the pipe could give very sightly and cause some unusual results in the wood being sanded. Just thinking out loud.

Nice design, hope you show us more of it.
Ed in Tampa
Stay out of trouble!
gr8mesquite
Gold Member
Posts: 95
Joined: Sat Jul 23, 2011 6:39 pm
Location: Tucson, AZ.

Post by gr8mesquite »

The hubs ( http://www.robotmarketplace.com/product ... 21225.html ) are a great idea. I wish I could find some to match my PVC diameter. I had to find aluminum stop collars so that I could drill them (Amazon.) If you're cost conscious, 4 collars cost only $5.
Thanks for the tip.

Jerome
User avatar
heathicus
Platinum Member
Posts: 2648
Joined: Wed Oct 22, 2008 1:02 am
Location: WhoDat Nation

Post by heathicus »

Interesting. I really like the idea of using table tubes with the carriage for the sanding table.

Also, check out the thickness sander that Shipwright made: https://forum.shopsmith.com/viewtopic.php?t=9382
Heath
Central Louisiana
-10ER - SN 13927, Born 1949, Acquired October 2008, Restored November, 2008
-10ER - SN 35630, Born 1950, Acquired April 2009, Restored May 2009, A34 Jigsaw
-Mark V - SN 212052, Born 1986, Acquired Sept 2009, Restored March 2010, Bandsaw
-10ER - SN 39722, Born 1950, Acquired March 2011, awaiting restoration
User avatar
JPG
Platinum Member
Posts: 35430
Joined: Wed Dec 10, 2008 7:42 pm
Location: Lexington, Ky (TAMECAT territory)

Post by JPG »

Interesting bench vise!:cool:

Is the entire length of the 'tube' plugged? What is the purpose of the screws along the length?

Velcro? Ok for 'finish' work, but thickness sanding?

Finally, why aluminum? Yer bits not work on steel parts?:confused:

Oh BTW, nice job!!!
╔═══╗
╟JPG ╢
╚═══╝

Goldie(Bought New SN 377425)/4" jointer/6" beltsander/12" planer/stripsander/bandsaw/powerstation /Scroll saw/Jig saw /Craftsman 10" ras/Craftsman 6" thicknessplaner/ Dayton10"tablesaw(restoredfromneighborstrashpile)/ Mark VII restoration in 'progress'/ 10
E[/size](SN E3779) restoration in progress, a 510 on the back burner and a growing pile of items to be eventually returned to useful life. - aka Red Grange
gr8mesquite
Gold Member
Posts: 95
Joined: Sat Jul 23, 2011 6:39 pm
Location: Tucson, AZ.

Post by gr8mesquite »

Thanks for your comments and questions. Let me try to address some of your observations.

In addition to the end caps, the tube has a series of plugs inserted. I cut them, drilled them, lathered them with glue, and inserted them. In addition to the glue, there is a series of screws running along the length of the tube as additional security (the belt and suspenders theory.) I did not opt to turn a solid plug as I would have had difficulty drilling a ½ bore thru 17” of solid wood. I could have cut a bunch more plugs and glued them all together to make a solid core, but I felt there was little need. The drum is very stable.

I used PVC to get a smooth surface for good adhesion of the Velcro. I used Velcro for quick and easy change of grits, lest I have to make 2 or 3 more drums. The sander is not meant to take off major amounts of wood—I have my planer for that. The sander is basically for leveling out (i.e., a segment ring) and for smoothing before a hand or finishing sander go over.

Finally, too much trouble to drill hardened steel stop collars. Given the narrow margin, I wanted my drill bit to cut in right away without effort. There is no benefit to steel collars over aluminum.

Ed, you asked for more pics, so here goes:

[ATTACH]22169[/ATTACH]

This shows the tubes attached to the bottom of the table. This can easily be refined, but I did it quickly with stuff on hand.

[ATTACH]22170[/ATTACH]

Parallel is achieved by adjusting the height of the floating end table. A trunnion table would be great, but alas...

[ATTACH]22171[/ATTACH]

The dust cover is fixed into dowel holes in the gizmo attached to the way tubes, and into holes in the pillow bearing base.

[ATTACH]22172[/ATTACH]

Attaching the Velcro backed sander strip.


Thanks again for looking.

Jerome
Attachments
DSC03740.JPG
DSC03740.JPG (44.65 KiB) Viewed 4041 times
DSC03737.JPG
DSC03737.JPG (57.22 KiB) Viewed 4038 times
DSC03738.JPG
DSC03738.JPG (68.8 KiB) Viewed 4031 times
DSC03734.JPG
DSC03734.JPG (68.8 KiB) Viewed 4036 times
Post Reply