Looking for a Mark VII speed change follower
Moderator: admin
-
JPG

- Platinum Member
- Posts: 35598
- Joined: Wed Dec 10, 2008 7:42 pm
- Location: Lexington, Ky (TAMECAT territory)
Differing opinions re how, or where?zenman wrote:Bill, how would you stake the bearing every 90 degrees? Apparently the group of young mech eng guys here have differing opinions.
Position the control sheave with bearing held securely in place and 'ding' the snout projection.
Rotate 180 degrees and repeat.
Rotate 90 degrees and repeat.
Rotate 180 degrees and repeat.
Fer yer ME types, 180 degrees = a half revolution, and 90 degrees = a quarter revolution. Do I need to explain 'ding'?;)
What are their opinions?

╔═══╗
╟JPG ╢
╚═══╝
Goldie(Bought New SN 377425)/4" jointer/6" beltsander/12" planer/stripsander/bandsaw/powerstation /Scroll saw/Jig saw /Craftsman 10" ras/Craftsman 6" thicknessplaner/ Dayton10"tablesaw(restoredfromneighborstrashpile)/ Mark VII restoration in 'progress'/ 10E[/size](SN E3779) restoration in progress, a 510 on the back burner and a growing pile of items to be eventually returned to useful life. - aka Red Grange
-
joshh

- Platinum Member
- Posts: 723
- Joined: Tue Jan 08, 2013 8:53 pm
- Location: Dallas / Fort Worth, Texas
I think they are hung up on the literal words. You don't actually stake the bearing as much as you stake the bearing "in place". You are actually staking the bore to hold the bearing in place.
I'm looking for a better picture (do NOT stake the inside like shown below, it's simply an example)
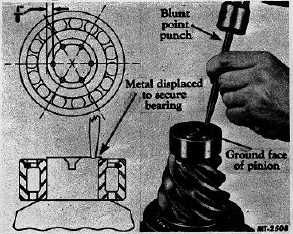
Here is a picture that might help. This picture is NOT of a shopsmith but has the same concept. The picture has stakes every 60 degrees (360 divided by 6). For 90 degrees it's 4 stakes as JPG described. Do stake "opposites" like JPG described as well. If you simply go around in a circle, you can cock the bearing to one side and cause it to fail early.
I'm looking for a better picture (do NOT stake the inside like shown below, it's simply an example)
Here is a picture that might help. This picture is NOT of a shopsmith but has the same concept. The picture has stakes every 60 degrees (360 divided by 6). For 90 degrees it's 4 stakes as JPG described. Do stake "opposites" like JPG described as well. If you simply go around in a circle, you can cock the bearing to one side and cause it to fail early.
- 1986 Mark V 500 Mini
- 1985 Mark V 510 with reversible motor, bandsaw, jointer, and double-tilt.
I offer quality motor reversal, rebuilding, and rewiring. Contact me at HarbourTools@live.com
- 1985 Mark V 510 with reversible motor, bandsaw, jointer, and double-tilt.
I offer quality motor reversal, rebuilding, and rewiring. Contact me at HarbourTools@live.com
staking
you are correct, these guys werent familiar with the punch process to seat the bearing. they were thinking about shiming the bearing with a fine metal film and then pressing or using an expansion compound around the bearing and activating. one guy suggested heating the collar and then compressing using a band, and then there was the loctite and adhesive guy who said that will last until I get another shopsmith. he broke the original sheave. I don't think he cares. I think the lip on the sheave that cracked was in fact staking that he didn't identify which complicated the pressing out of the bearing. the staking caused the collar to expand as the bearing was pressed out causing expansion fracture.
after the bearing is staked, to remove, is the bearing just pressed out or is the stake pounded back and reshaped, then the bearing is pressed out. is there a danger of the metal chipping when pounded that jpg might have seen and fixed with epoxy.
after the bearing is staked, to remove, is the bearing just pressed out or is the stake pounded back and reshaped, then the bearing is pressed out. is there a danger of the metal chipping when pounded that jpg might have seen and fixed with epoxy.
-
joshh
- Platinum Member
- Posts: 723
- Joined: Tue Jan 08, 2013 8:53 pm
- Location: Dallas / Fort Worth, Texas
zenman wrote:you are correct, these guys werent familiar with the punch process to seat the bearing. they were thinking about shiming the bearing with a fine metal film and then pressing or using an expansion compound around the bearing and activating. one guy suggested heating the collar and then compressing using a band, and then there was the loctite and adhesive guy who said that will last until I get another shopsmith. he broke the original sheave. I don't think he cares. I think the lip on the sheave that cracked was in fact staking that he didn't identify which complicated the pressing out of the bearing. the staking caused the collar to expand as the bearing was pressed out causing expansion fracture.
after the bearing is staked, to remove, is the bearing just pressed out or is the stake pounded back and reshaped, then the bearing is pressed out. is there a danger of the metal chipping when pounded that jpg might have seen and fixed with epoxy.
Most of my experience with replacing bearings are on motor homes, diesel trucks (F450 or larger), and some small cars, etc. so I would defer to others as to what best on the more delicate control sheave.
In my experience, I don't really try to "fix" the prior stakes as much as debur them and remove the bearing. Light tapping and a file usually works well for me with bearings, but there may be something else JPG suggests for this application.
It shouldn't be too hard to unstake the bearing and remove it. Before putting the new bearing in, make sure the bore is smooth and no remains of the previous stakes are hanging into the bore. Replace the bearing and stake it as JPG described above. Do NOT stake the same place as a previous staking.
All this talk makes me want a good filet mignon (get it? Eh? Eh? Steak?)
- 1986 Mark V 500 Mini
- 1985 Mark V 510 with reversible motor, bandsaw, jointer, and double-tilt.
I offer quality motor reversal, rebuilding, and rewiring. Contact me at HarbourTools@live.com
- 1985 Mark V 510 with reversible motor, bandsaw, jointer, and double-tilt.
I offer quality motor reversal, rebuilding, and rewiring. Contact me at HarbourTools@live.com
-
joshh
- Platinum Member
- Posts: 723
- Joined: Tue Jan 08, 2013 8:53 pm
- Location: Dallas / Fort Worth, Texas
zenman wrote:you are correct, these guys werent familiar with the punch process to seat the bearing.
The bearing should be all the way in place BEFORE you stake it in.
I think your mechanical engineer friends would have benefited from being mechanics first
- 1986 Mark V 500 Mini
- 1985 Mark V 510 with reversible motor, bandsaw, jointer, and double-tilt.
I offer quality motor reversal, rebuilding, and rewiring. Contact me at HarbourTools@live.com
- 1985 Mark V 510 with reversible motor, bandsaw, jointer, and double-tilt.
I offer quality motor reversal, rebuilding, and rewiring. Contact me at HarbourTools@live.com

Thanks everyone for the posts on staking the control sheave bearing. I stake 45 deg from the Shopsmith stakes. I find about half the control sheaves I remove are not staked with the bearing even with the end of the control sheave. These are the ones that I have been asked to repair after the owner had replaced the bearing and the bearing pulled out later. I do not remove the stakes before removing the bearing as I have machined a tool I use inside the control sheave column and have not split or cracked the control sheave column when doing this. Yes, I use the lathe to clean up any protruding stakes when machining the bearing depth deeper. I have been machining every control sheave for deeper bearing depth. This is a picture of the Shopsmith staking.joshh wrote:Most of my experience with replacing bearings are on motor homes, diesel trucks (F450 or larger), and some small cars, etc. so I would defer to others as to what best on the more delicate control sheave.
In my experience, I don't really try to "fix" the prior stakes as much as debur them and remove the bearing. Light tapping and a file usually works well for me with bearings, but there may be something else JPG suggests for this application.
It shouldn't be too hard to unstake the bearing and remove it. Before putting the new bearing in, make sure the bore is smooth and no remains of the previous stakes are hanging into the bore. Replace the bearing and stake it as JPG described above. Do NOT stake the same place as a previous staking.
All this talk makes me want a good filet mignon (get it? Eh? Eh? Steak?)
[ATTACH]23642[/ATTACH]
- Attachments
-
- 100_0787.JPG (21.89 KiB) Viewed 1533 times
Bill Mayo bill.mayo@verizon.net
Shopsmith owner since 73. Sell, repair and rebuild Shopsmith, Total Shop & Wood Master headstocks, SPTs, attachments, accessories and parts. US Navy 1955-1975 (FTCS/E-8)
Shopsmith owner since 73. Sell, repair and rebuild Shopsmith, Total Shop & Wood Master headstocks, SPTs, attachments, accessories and parts. US Navy 1955-1975 (FTCS/E-8)
-
joshh
- Platinum Member
- Posts: 723
- Joined: Tue Jan 08, 2013 8:53 pm
- Location: Dallas / Fort Worth, Texas
If you get them to make some out of aluminum, I'll bet you can sell the extra for a premium.
Do let us know if you need anything else!
P.S. don't limit yourself to shopsmith questions here, several forum members are engineers.
Do let us know if you need anything else!
P.S. don't limit yourself to shopsmith questions here, several forum members are engineers.
- 1986 Mark V 500 Mini
- 1985 Mark V 510 with reversible motor, bandsaw, jointer, and double-tilt.
I offer quality motor reversal, rebuilding, and rewiring. Contact me at HarbourTools@live.com
- 1985 Mark V 510 with reversible motor, bandsaw, jointer, and double-tilt.
I offer quality motor reversal, rebuilding, and rewiring. Contact me at HarbourTools@live.com
-
JPG
- Platinum Member
- Posts: 35598
- Joined: Wed Dec 10, 2008 7:42 pm
- Location: Lexington, Ky (TAMECAT territory)
joshh wrote:If you get them to make some out of aluminum, I'll bet you can sell the extra for a premium.
Do let us know if you need anything else!
P.S. don't limit yourself to shopsmith questions here, several forum members are engineers.
Perhaps! They would not move at $80!!!!:(
P.S. And FWIW re your ME 'clowns', I agree that for mechanical 'useful' advice, consult a mechanic(or a ME that used to be one). Just like for questions regarding electrical house wiring(power type), ask an electrician, not an EE(or an EE . . . same as above). I assume you are not about to need road building/mining/oil drilling expertise etc. so I will leave those injuneers out of this discussion.
╔═══╗
╟JPG ╢
╚═══╝
Goldie(Bought New SN 377425)/4" jointer/6" beltsander/12" planer/stripsander/bandsaw/powerstation /Scroll saw/Jig saw /Craftsman 10" ras/Craftsman 6" thicknessplaner/ Dayton10"tablesaw(restoredfromneighborstrashpile)/ Mark VII restoration in 'progress'/ 10E[/size](SN E3779) restoration in progress, a 510 on the back burner and a growing pile of items to be eventually returned to useful life. - aka Red Grange
╟JPG ╢
╚═══╝
Goldie(Bought New SN 377425)/4" jointer/6" beltsander/12" planer/stripsander/bandsaw/powerstation /Scroll saw/Jig saw /Craftsman 10" ras/Craftsman 6" thicknessplaner/ Dayton10"tablesaw(restoredfromneighborstrashpile)/ Mark VII restoration in 'progress'/ 10E[/size](SN E3779) restoration in progress, a 510 on the back burner and a growing pile of items to be eventually returned to useful life. - aka Red Grange