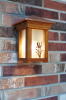
First a shot of the entire setup:

FirstFrame-2 by J L Smith, on Flickr
This is an old painting (17 3/4" x 23", frame is 2.5" wide) of some sort that a co-worker wanted me to frame (no glass). It's on some sort of thick cardboard/backer board and was irregular in shape, which was a booger bear when it came to mounting it on the rabbet (I had to hand-sand down the tops and bottoms to fit the form).
I've actually got another frame to make for the matching painting, but figured I'd just show one
Primary wood was a beautiful cut of cherry, inlay is a thin strip of wormy maple. I applied linseed oil to the frame and let it sit in the sun for 8 hours to darken a bit, then applied 3 coats of semi-gloss lacquer over the top.
Learned a lot, that's for sure. My list of thoughts and mistakes

FirstFrame-3 by J L Smith, on Flickr
Luckly for me, one mistake I *didn't* make was planning where the details in the wood were going to end up. As above, I wanted the knot to be on the outer edge of the frame, and it came out great. Same with the inlay, as there were a few knots I wanted to keep in the look.
However, I did have a "whoa" moment - I was cutting the thin inlay with my table saw (because I don't have a bandsaw yet) and since the strip was so small, hitting a knot in it caused a massive kickback / break in the strip of wood (it was maybe 1.5" x 1", not a large piece I know).
I've since turned my SS 90 degrees so that any future kickbacks hit the side of my garage wall instead of towards the (normally open) door, as I'm scared a kid will get hit.

FirstFrame-1 by J L Smith, on Flickr
Mitered corners mostly turned out okay. I was using the SS Miter Pro , and I just couldn't get the corners to line up properly -- I'm probably going to just build myself the fancy sled for miters, as I don't like the Miter Pro, since the fence it comes with can't support longer pieces.
Luckily I remembered a tip I read about keeping sawdust, as I had one corner that was a bit too erroneous for good looks (not shown), so I mixed some dust and glue and patched it up afterwards and it worked fine. I should have also used maple dust/glue for the maple inlay gap, but I was too lazy to chop up some maple for dust and it wasn't that large in the first place.
Getting the inlay right was a booger bear. First, planing the inlay flush with the frame was darn-near impossible, as I'd be working great then the grain would change and I'd have a massive tearout. I had to resort to sanding for most of the work, though I'd get close with the plane if the grain on the maple worked (that's one negative about knots in the inlay, my plane hates them).
And of course, nothing's complete without an epic failure
I was compared all four pieces of wood before glue up (inlay already glued) and discovered two of my pieces, somehow, weren't planed to the same thickness as the other two.
I had to plane from the top of the board (yes, with the inlay already in). One piece made it through the Dewalt okay (cutting on fine). The other piece? Let's just say I had to reroute and place another piece of inlay in
Thanks for reading.