
- brass showing.png (345.37 KiB) Viewed 8246 times
Letter opener and other questions
Moderator: admin
Re: Letter opener and other questions
Not keeping the tool sharp and not taking my time. I saved it, fished pieces out of vacuum and epoxied and turned.
- Attachments
-
- Crap.png (310.39 KiB) Viewed 8246 times
Joe
520, Bandsaw, Beltsander, Delta Drill Press, Delta Lathe, Craftsman Planner/Jointer, Delta Planner, Mini "Greenie" Shorty 500
Being a VETERAN is an honor
Being a GRANDPA is priceless
520, Bandsaw, Beltsander, Delta Drill Press, Delta Lathe, Craftsman Planner/Jointer, Delta Planner, Mini "Greenie" Shorty 500
Being a VETERAN is an honor
Being a GRANDPA is priceless
-
richardrouse
- Gold Member
- Posts: 220
- Joined: Tue Jul 21, 2015 7:16 pm
- Location: Haines City FLorida
Re: Letter opener and other questions
I turn acrylics all the time. I love the material, but it has its quirks.
1) tools have to be super sharp. I usually sharpen halfway through a pen.
2) ditto on drill bits. I have drill bit's that only get used on acrylic.
- be sure to back out often, if the bit gets stuck, you'll have to bake the plastic to get the bit out.. the wifey no like that so much.
3)I paint my tubes white. Alot of those blendyThe blanks that you'll get from woodcraft are semi transparent. White tubes keep the tube from poking out.
4) wet sanding is helpful but not neccessary. Using some kind of plastic polish at the end is a must to get the full effect. I use the headlight restoration stuff that you get at autozone.. works great.
The Wallstreet letter opener is beautiful when turned I've made one of them. Be careful when turning the tenon on the end, it's an opportunity to catch and destroy the blank.

Re: Letter opener and other questions
Ed,
Regarding the too short a piece, save it and on the band saw at slow speed cut it into a few more pieces, maybe 1/4" or 3/8" each. Later you can use a good epoxy and glue a few pieces together to make a multi colored blank or highlights on the end (or middle) of a different blank.
Your thoughts of using a bandsaw at a slow speed are good.
Not certain why you believe dulling the bit would make for better results? The duller the bit the more heat that will be generated and heat is not your friend when working with acrylic pen blanks.
If you are going to do much with acrylic, you might want to check out some bits made specifically for acrylic. They tend to have a different point rather than the 135 on most regular bits and often the flutes have a couple bevels to help with chip ejection (I presume). I have a Fisch 7mm that I loaned to a friend and have yet to see it back, but I haven't turned an acrylic pen in over a year. It has a much sharper bit angle. He also has a couple made by colt that have a little nib on the front. The true purpose of the nib I don't know but suspect it has something to do with guiding the bit.
In years past I have had a few ends blow out, but I believe it was because I was trying to drill too fast and probably too much force on the bit. I now use the Nova pen jaws since they remove most of my previous problems drilling blanks (and there were many!!)
http://www.shopsmith.com/ss_forum/viewt ... va#p153580
be well,
Ben
Regarding the too short a piece, save it and on the band saw at slow speed cut it into a few more pieces, maybe 1/4" or 3/8" each. Later you can use a good epoxy and glue a few pieces together to make a multi colored blank or highlights on the end (or middle) of a different blank.
Your thoughts of using a bandsaw at a slow speed are good.
Not certain why you believe dulling the bit would make for better results?
If you are going to do much with acrylic, you might want to check out some bits made specifically for acrylic. They tend to have a different point rather than the 135 on most regular bits and often the flutes have a couple bevels to help with chip ejection (I presume). I have a Fisch 7mm that I loaned to a friend and have yet to see it back, but I haven't turned an acrylic pen in over a year. It has a much sharper bit angle. He also has a couple made by colt that have a little nib on the front. The true purpose of the nib I don't know but suspect it has something to do with guiding the bit.
In years past I have had a few ends blow out, but I believe it was because I was trying to drill too fast and probably too much force on the bit. I now use the Nova pen jaws since they remove most of my previous problems drilling blanks (and there were many!!)
http://www.shopsmith.com/ss_forum/viewt ... va#p153580
be well,
Ben

Re: Letter opener and other questions
Got out to the woodcraft store today. They didn't have any more of the blanks in the color I had previously picked out so I had to get another color called cobalt. I don't like it as well but maybe I'll let it better once I see the finished product. It is a gift so as long as I don't mess it up things should be OK.benush26 wrote:Ed,
Regarding the too short a piece, save it and on the band saw at slow speed cut it into a few more pieces, maybe 1/4" or 3/8" each. Later you can use a good epoxy and glue a few pieces together to make a multi colored blank or highlights on the end (or middle) of a different blank.
************
I don't normally throw things away, actually in most cases a bad habit, but you make a good point about using them for something else like an accent ring or some such.
*************
Your thoughts of using a bandsaw at a slow speed are good.
Not certain why you believe dulling the bit would make for better results?
**************
Perhaps a poor choice of words on my part. I picked up a new twist drill bit of the correct size 27/64 and I will see if I can get some pictures of the process. The design of these bits causes them to pull forward as they break through end. The web then gets involved and the result is cracking in the plastic or grabbing and spinning around a piece of metal.
When I worked in a machine shop I was taught how to reduce this by making a small flat on the cutting edge. They actually did this on pretty large bits because it was cheaper then investing in the "designer" bits with this feature. When drilling things like brass or plastic this works quite well and I know some of the guys had done this to a whole set of bits so they were all boxed and ready to go. I forgot about it until I had the catch.
***************
If you are going to do much with acrylic, you might want to check out some bits made specifically for acrylic. They tend to have a different point rather than the 135 on most regular bits and often the flutes have a couple bevels to help with chip ejection (I presume). I have a Fisch 7mm that I loaned to a friend and have yet to see it back, but I haven't turned an acrylic pen in over a year. It has a much sharper bit angle. He also has a couple made by colt that have a little nib on the front. The true purpose of the nib I don't know but suspect it has something to do with guiding the bit.
****************
I have a post here somewhere talking about plastic drilling bits. When I was working at my last job the company took care of buying things and I had no idea what the cost was. I found some sets of common sizes in the $60 range and had thought about buy them but the set is so limited as to number of bits and sizes I'm not sure they are worth it. A good set of 1/16 thru 1/2 by 64ths (which I would need to get the 27/64) is about $600 and I just don't see me spend that amount for them.
I have a set of the Fusch bits as well but they are all metric so again the 27/64" is an odd size for specialty bits. I believe that the bits are pretty expensive when purchased as a one of and in this size if I could even find it might not be worth it.
*****************
In years past I have had a few ends blow out, but I believe it was because I was trying to drill too fast and probably too much force on the bit. I now use the Nova pen jaws since they remove most of my previous problems drilling blanks (and there were many!!)
http://www.shopsmith.com/ss_forum/viewt ... va#p153580
*****************
Yes I remember your post and yes I did get that same set of jaws. They are really nice and that is all I use for drilling blanks now. And yes it was in use when I did this last bit of drilling.
*****************
be well,
Ben
Really busy day so I didn't have time to work on it today, maybe tomorrow or Friday. I'd like to get the drilling done then let it set and cure for a day before turning.
So this is where I am now.
Ed
{Knight of the Shopsmith} [Hero's don't wear capes, they wear dog tags]
-
RobertTaylor
- Platinum Member
- Posts: 569
- Joined: Mon Sep 03, 2007 9:28 am
- Location: North Canton, Ohio
Re: Letter opener and other questions
When I do acrylic blanks I do all most everything the opposite of everyone that has posted except for rpd. Mark your drill bit slightly longer than the tube, drill then cut. Paint the inside of the blank, NOT the tube. On many blanks where the tube is painted the glue will show through. While I am NOT a fan of the "Easy Wood " tools this is where they excel. IMO FYI Woodcraft has a 90 day satisfaction guarantee and will replace the blank that you blew out. I have used that feature. This short video may help you understand turning acrylics better. Also on a letter opener the length is NOT critical you can make the handle shorter and noone will know. In the second video I do Not agree with his drilling and squaring methods but the way that he turns and finishes it is pretty much the way that I do it. Before assembly make sure that there is no glue remaning and chamfer/deburr the inside edge of the tubes. I use a countersink and gently twist by hand. Bob
https://www.youtube.com/watch?v=I1s0rUvg4xE
https://www.youtube.com/watch?v=Z397snJISSQ
https://www.youtube.com/watch?v=I1s0rUvg4xE
https://www.youtube.com/watch?v=Z397snJISSQ
Last edited by RobertTaylor on Thu Jun 02, 2016 3:47 pm, edited 1 time in total.
Re: Letter opener and other questions
I'm in on my lunch hour so I decided to get a few inside things done before I go plant shopping this afternoon.
I'm not real happy with the pictures but I think you will get the idea of how this drill bit alteration works. I used a diamond file but a normal file will work or even touching it to a grinding wheel works.
The first picture is the bit as it came out of the package.
Now after I put the small flat on it.
Thanks for the video links, I'll look at it later today.
Ed
I'm not real happy with the pictures but I think you will get the idea of how this drill bit alteration works. I used a diamond file but a normal file will work or even touching it to a grinding wheel works.
The first picture is the bit as it came out of the package.
- IMG_2185scm.jpg (60.87 KiB) Viewed 8165 times
- IMG_2186sc.jpg (59.1 KiB) Viewed 8165 times
Ed
{Knight of the Shopsmith} [Hero's don't wear capes, they wear dog tags]
Re: Letter opener and other questions
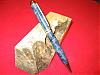
Just a short note on the progress of the letter opener. It's finished!
I drilled and glued in the tube the other day. The drilling when just about perfect this time. I did the drilling with the blank full size and the hole just deeper then the length I needed. I then trimmed so the hole was clean and true.
I used an epoxy that is a very light gray and as expected I could not see the tube anyway.
Today I trimmed the blank to the tube length and then turned it. I have a negative rake scraper and while it was working it was really slow. I decide to use my easy tool pen took with radius cutter and set it a bit lower then normal for more of a scraping action which worked just fine as was a bit faster.
The finish actually looked pretty good just after turning it, good enough that I started at 320 grit and then went up to 600 with turning and straight sanding. From there I went to wet pad sanding to 12000 grit. I was almost going to stop at that point as it looked about as good as I thought it could but since I had purchased some 20/20 plasti-polish.....
It looks great!
And it is even done ahead of when I need it by a month and a day! Not often I do that, most times its a day late and you know the rest of that story.
Still don't like the smell but the plastic really polishes up nice. I'll have to decide if I want to do any more of these, or go back to wood.
Thanks for the tips.
Ed
{Knight of the Shopsmith} [Hero's don't wear capes, they wear dog tags]
Re: Letter opener and other questions
CONGRATULATIONS!!!! I am certain whom ever receives it will thoroughly enjoy the personal craftsmanship. 
Be well,
Ben
Be well,
Ben
Re: Letter opener and other questions
Well it might be too well done. The people who I have showed it to think I purchased it somewhere......... And these are people who know I build/make things.
Ed
- IMG_2368scm.jpg (122.15 KiB) Viewed 8071 times
{Knight of the Shopsmith} [Hero's don't wear capes, they wear dog tags]

Re: Letter opener and other questions
That looks very nice, Ed. I like that style. I made the cheaper looking kit with redwood burl. I think I would take it as a compliment that they thought it was bought.
PowerPro Mark 7, 11" Bandsaw, 4" Jointer, 12" Professional Planer, DC3300 Dust Collector, DW745, DW718 w/ DW723 and a DW788 w/ DW7880.
Success is not final, failure is not fatal: it is the courage to continue that counts. -Winston Churchill
Success is not final, failure is not fatal: it is the courage to continue that counts. -Winston Churchill