Premium casters, revision “D”

Forum for Maintenance and Repair topics. Feel free to ask questions or contribute.

Moderator: admin

User avatar
rcplaneguy
Platinum Member
Posts: 549
Joined: Mon Sep 23, 2013 6:33 pm
Location: Chapel Hill, NC

Premium casters, revision “D”

Post by rcplaneguy »

Just got the premium casters from SS, speedy delivery. I read through the entire LONG thread on these things, but still came away confused. Is the concensus that the current instructions and drilling template are correct (my SS is a 510 from 1984)? As I measure the template, the offset between old and new holes is 1-11/16”.
Thanks! (And please don’t refer me back to that exceedingly long thread)
Image
User avatar
JPG
Platinum Member
Posts: 35600
Joined: Wed Dec 10, 2008 7:42 pm
Location: Lexington, Ky (TAMECAT territory)

Re: Premium casters, revision “D”

Post by JPG »

Looks like 1 21/32 in the pix.

That seems a bit much to me IIRC. Splitting hairs me thinks though.

I will review that thread.
╔═══╗
╟JPG ╢
╚═══╝

Goldie(Bought New SN 377425)/4" jointer/6" beltsander/12" planer/stripsander/bandsaw/powerstation /Scroll saw/Jig saw /Craftsman 10" ras/Craftsman 6" thicknessplaner/ Dayton10"tablesaw(restoredfromneighborstrashpile)/ Mark VII restoration in 'progress'/ 10
E[/size](SN E3779) restoration in progress, a 510 on the back burner and a growing pile of items to be eventually returned to useful life. - aka Red Grange
User avatar
JPG
Platinum Member
Posts: 35600
Joined: Wed Dec 10, 2008 7:42 pm
Location: Lexington, Ky (TAMECAT territory)

Re: Premium casters, revision “D”

Post by JPG »

I have reviewed that thread.

IIWM today, I would do the self determination of the hole location as I described in that thread. I think that would result in a shorter offset between the original holes and the new holes then 1 21/32.

JMHO ;)

BTW the holes s/b 9/32 I believe.
╔═══╗
╟JPG ╢
╚═══╝

Goldie(Bought New SN 377425)/4" jointer/6" beltsander/12" planer/stripsander/bandsaw/powerstation /Scroll saw/Jig saw /Craftsman 10" ras/Craftsman 6" thicknessplaner/ Dayton10"tablesaw(restoredfromneighborstrashpile)/ Mark VII restoration in 'progress'/ 10
E[/size](SN E3779) restoration in progress, a 510 on the back burner and a growing pile of items to be eventually returned to useful life. - aka Red Grange
User avatar
reible
Platinum Member
Posts: 11283
Joined: Thu Jul 20, 2006 12:08 pm
Location: Aurora, IL

Re: Premium casters, revision “D”

Post by reible »

I did another one of these this last fall. They now supply washers to those that wish to use them.

I like to have a full 1/2" on the high setting and 1/4" on the middle setting and to have the machine sitting flat with some space between the floor and the casters in the lowest setting. I got that when I hand did my holes.

The template that I used this fall did not give me this. If you can live with less space then use the template. It it not as high as you like then try adding the washers. The most important setting is in the lowest position, you really need the machine to sit on the floor so it doesn't wheel around. The other settings are a matter of preference. For me I drag my machine out on a very ruff driveway so I need all the lift I can get.

Ed
{Knight of the Shopsmith} [Hero's don't wear capes, they wear dog tags]
User avatar
rcplaneguy
Platinum Member
Posts: 549
Joined: Mon Sep 23, 2013 6:33 pm
Location: Chapel Hill, NC

Re: Premium casters, revision “D”

Post by rcplaneguy »

Ok Ed and Red, thx for the advice. I suppose both of you did not invert the SS to determine. And I further take it that 1-5/8” or a tad less might be the outcome. Now to find a decent 1/2” board to cut up for spacers before clamping.
User avatar
reible
Platinum Member
Posts: 11283
Joined: Thu Jul 20, 2006 12:08 pm
Location: Aurora, IL

Re: Premium casters, revision “D”

Post by reible »

I have to revise what I said. The last set that I did, the one last fall, I used the shopsmith jig they sell rather then the template. I did not verify if the template and the jig do the same thing but I do know that the casters were not as high as I would have liked.

By the way there have been several discussions on this. In one of them I did detail how I did my first set. At the time the template was not right, I believe mine was one that was copied and not at 1:1 so it was pretty much useless. So at that time a home brew solution was the only solution.

Ed
{Knight of the Shopsmith} [Hero's don't wear capes, they wear dog tags]
User avatar
dusty
Platinum Member
Posts: 21530
Joined: Wed Nov 22, 2006 6:52 am
Location: Tucson (Wildcat Country), Arizona

Re: Premium casters, revision “D”

Post by dusty »

The first template that Shopsmith distributed might well have been incorrect however I can not (did not) confirm that. I bought my first set of casters a bit later and had no problem at all. However, I used the template only as a source of dimensions. I fabricated a drilling template using those dimensions. Here are the dimensions that I used.
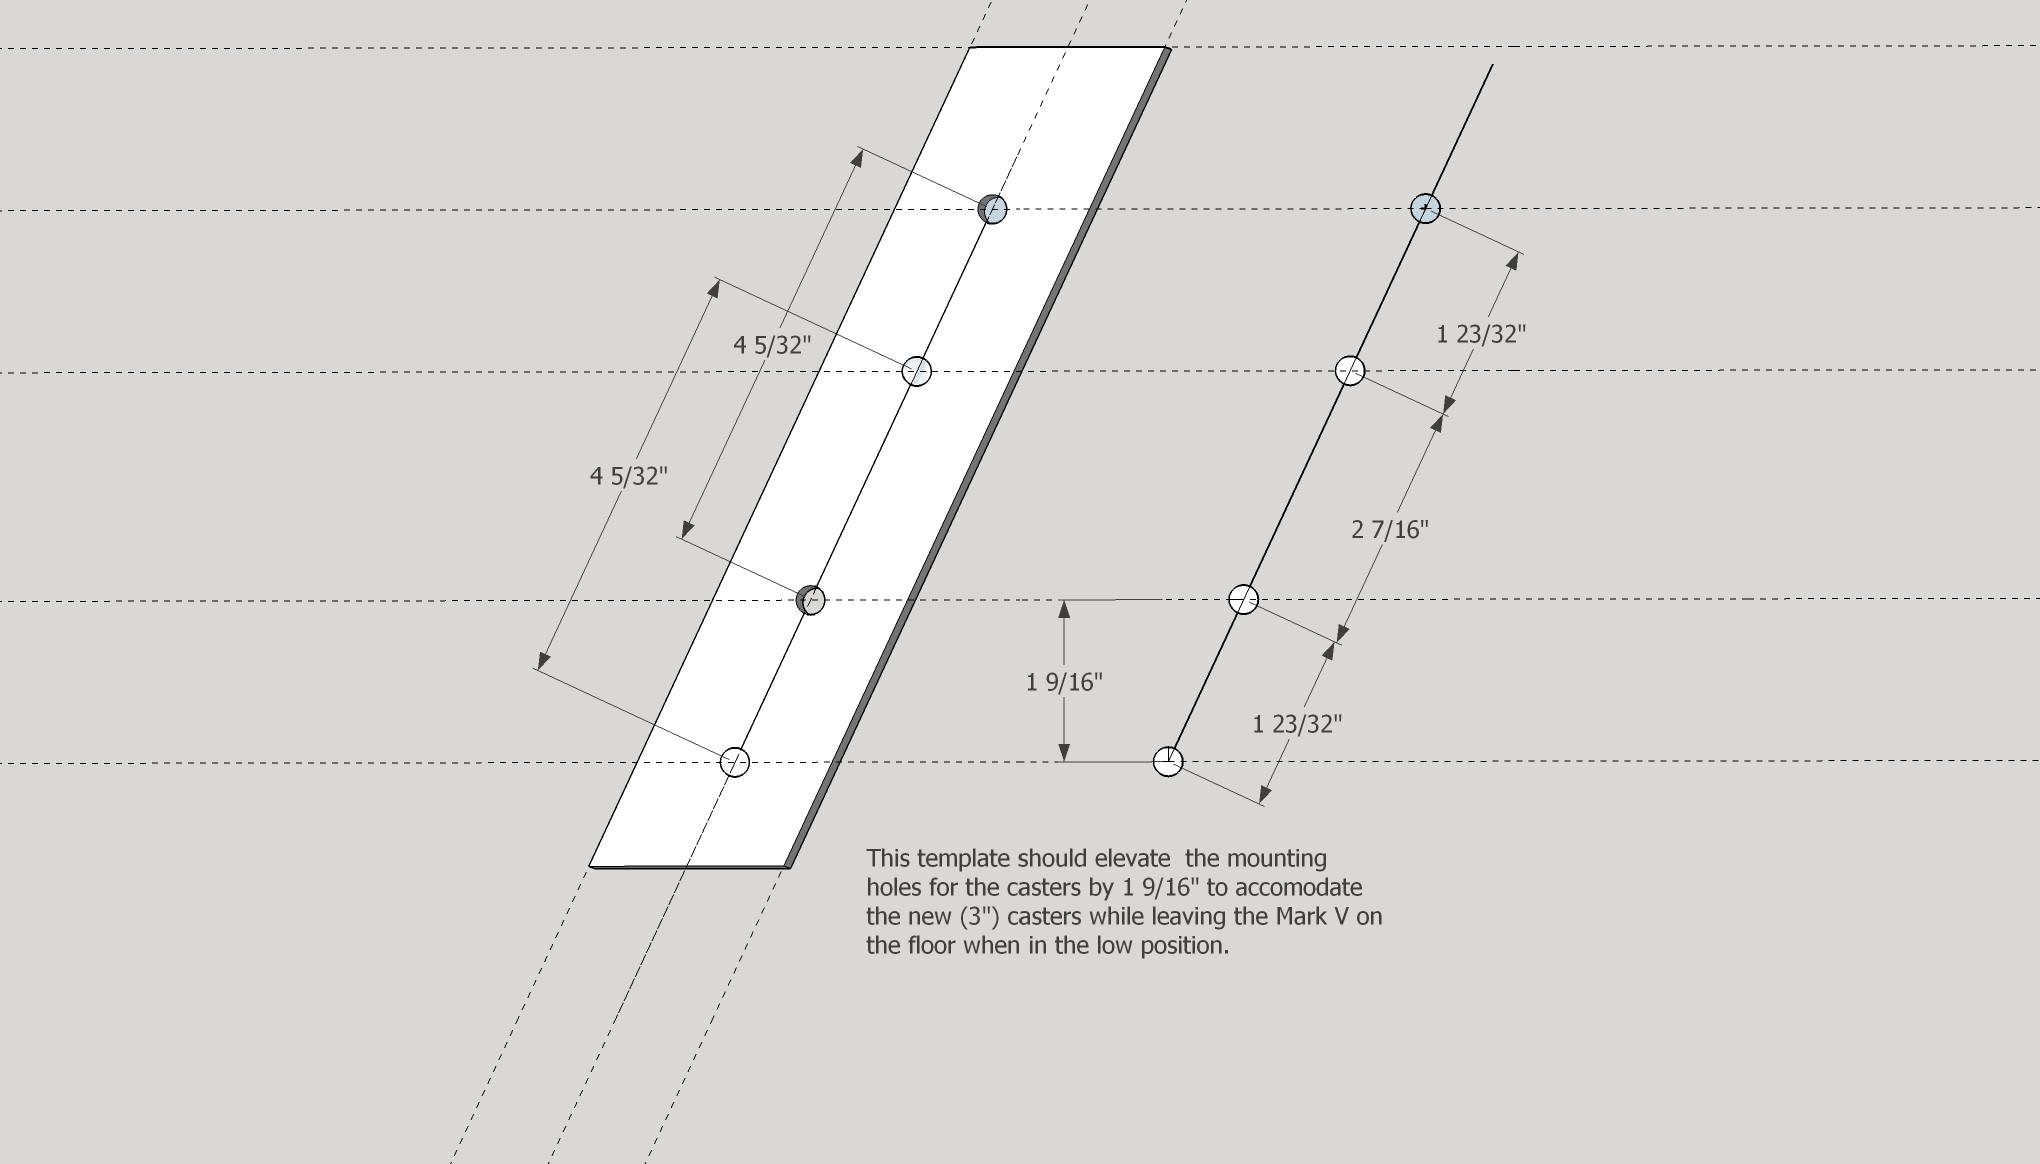
Caster Dimensions.png
Caster Dimensions.png (82.25 KiB) Viewed 7918 times

The dimensions given in fractions I believe can safely be rounded to the nearest 1/16" (maybe even to 1/8") with NO ill effect.

I modified the attached drawing to more clearly reflect the dimensions of the template that I used.

This is NOT a precision machining operation. The most critical dimension being the offset between the original holes and the resulting new holes. It is this offset that determines the height of the legs with respect to the floor.

I want my Mark V to sit firmly on the floor when the casters are retracted. Then, if the first "lift" is inadequate (does not provide sufficient clearance), I simply raise the Mark V to the second level.

When at the first level my Mark V legs are a tad less than 1/4" off the floor.

WORD OF CAUTION: Be aware that some of my dimensions depict separation measured at the edge of the holes and not the centers.

I have successfully installed three sets of casters using this template.
"Making Sawdust Safely"
Dusty
Sent from my Dell XPS using Firefox.
User avatar
rcplaneguy
Platinum Member
Posts: 549
Joined: Mon Sep 23, 2013 6:33 pm
Location: Chapel Hill, NC

Re: Premium casters, revision “D”

Post by rcplaneguy »

dusty wrote:
I have successfully installed three sets of casters using this template.

Thanks Dusty!
P89DC
Gold Member
Posts: 148
Joined: Fri Dec 29, 2017 11:23 am
Location: Greeley, CO

Re: Premium casters, revision “D”

Post by P89DC »

rcplaneguy wrote:...Is the concensus that the current instructions and drilling template are correct (my SS is a 510 from 1984)?...
I used that exact diagram for my upgrade on my 1986 legset. My set-up works fine without the washers but I added them for even more ground clearance.
1986 510, jointer, bandsaw, belt sander, scroll saw, jigsaw and lots of accessories. Shopsmith woodworking bench too!
User avatar
JPG
Platinum Member
Posts: 35600
Joined: Wed Dec 10, 2008 7:42 pm
Location: Lexington, Ky (TAMECAT territory)

Re: Premium casters, revision “D”

Post by JPG »

Part of the 'discussion' is regarding WHAT is 'just fine'.

Flat om the floor - raised off floor near to 1/4" - raised off floor 1/2:" is the 'de rigueur' definition.
╔═══╗
╟JPG ╢
╚═══╝

Goldie(Bought New SN 377425)/4" jointer/6" beltsander/12" planer/stripsander/bandsaw/powerstation /Scroll saw/Jig saw /Craftsman 10" ras/Craftsman 6" thicknessplaner/ Dayton10"tablesaw(restoredfromneighborstrashpile)/ Mark VII restoration in 'progress'/ 10
E[/size](SN E3779) restoration in progress, a 510 on the back burner and a growing pile of items to be eventually returned to useful life. - aka Red Grange
Post Reply