My Model 10-ER Journey

Forum for Maintenance and Repair topics. Feel free to ask questions or contribute.

Moderator: admin

MichaelCfffg
Gold Member
Posts: 30
Joined: Fri Sep 27, 2024 2:55 pm

Re: My Model 10-ER Journey

Post by MichaelCfffg »

Here is some additional stuff that was on the machine. The dead center is cupped behind its point, so I'm not sure what that is about. Maybe someone here can enlighten me. :confused: I've also got a live center that seems to work well, and what I'm calling a spindle drive point that is functional but has surface rust. :D

I've got two of these 12-inch sanding disks, but this one is really caked with something that looks like epoxy. :confused: I haven't tried to remove it yet, so it may not be that bad. The other sanding disk looks like it has a self-adhesive sandpaper piece on it. I'm hoping that one is more usable. :rolleyes:

I've also got a faceplate that I didn't take a separate photo of. It appears to be okay, and even has a piece of walnut attached to it.

There were two of these circlips lying on the machine. Unless someone can tell me where they might go on the machine, I suspect that they are from the old U-joints on my Ranger that I had to replace last winter.

Last but not least, this is Fowler. He likes to ride in the Ranger and accompany me when I'm working in the garage. :rolleyes: :D
Attachments
20240928_223510.jpg
20240928_223510.jpg (38.86 KiB) Viewed 2160 times
20240928_221617.jpg
20240928_221617.jpg (79.09 KiB) Viewed 2160 times
20240928_224154.jpg
20240928_224154.jpg (47.08 KiB) Viewed 2160 times
20240928_224245.jpg
20240928_224245.jpg (82.24 KiB) Viewed 2160 times
Last edited by MichaelCfffg on Sun Sep 29, 2024 6:03 pm, edited 2 times in total.
Mike Chambers
Franklin County, Missouri

1952 10ER, S/N 59677 (A work in process!)
MichaelCfffg
Gold Member
Posts: 30
Joined: Fri Sep 27, 2024 2:55 pm

Re: My Model 10-ER Journey

Post by MichaelCfffg »

Just a few more notes for this preliminary session.

I've got two Jacob's chucks and one key for both. One chuck is on a male Morse Taper, and the other is set up for quill spindle mounting.

I've got what appear to be saw arbors that are made for the machine, but they both have 9-inch x 36-tooth blades on them. I did find one other arbor after I took all of these photos. It appears to be more homemade, but it does have an 8-inch x 40-tooth carbide-tipped blade on it. The Shopsmith Owner's Guide says that the maximum saw blade diameter that can be used is 8-inch, so I'm going to have to see what that is all about.

My saw table and the extension table both have an oxide patina on them but don't appear to be corroded or pitted. They should clean up nicely!

I've got an 8-piece set of lathe tools, but am just starting to find out what tool does what. Can someone point me to a resource that explains what each of the various standard tools do? These are all steel tools, but would they be carbon steel or high-speed steel? They do have some surface rust on them, but should also clean up nicely.

That's about it for now. I'm looking forward to working with cleaning up and using this machine, and learning as much as possible from all the members of this forum. Thank you all!
Mike Chambers
Franklin County, Missouri

1952 10ER, S/N 59677 (A work in process!)
User avatar
JPG
Platinum Member
Posts: 35429
Joined: Wed Dec 10, 2008 7:42 pm
Location: Lexington, Ky (TAMECAT territory)

Re: My Model 10-ER Journey

Post by JPG »

They ain't Stainless steel!

I recommend either evaporust or electrolysis rust removal. Both stop short of removing base metal(attacks ONLY the rust). Then minimal 'polishing'.
╔═══╗
╟JPG ╢
╚═══╝

Goldie(Bought New SN 377425)/4" jointer/6" beltsander/12" planer/stripsander/bandsaw/powerstation /Scroll saw/Jig saw /Craftsman 10" ras/Craftsman 6" thicknessplaner/ Dayton10"tablesaw(restoredfromneighborstrashpile)/ Mark VII restoration in 'progress'/ 10
E[/size](SN E3779) restoration in progress, a 510 on the back burner and a growing pile of items to be eventually returned to useful life. - aka Red Grange
MichaelCfffg
Gold Member
Posts: 30
Joined: Fri Sep 27, 2024 2:55 pm

Re: My Model 10-ER Journey

Post by MichaelCfffg »

JPG wrote: Sun Sep 29, 2024 8:41 pm They ain't Stainless steel!

I recommend either evaporust or electrolysis rust removal. Both stop short of removing base metal(attacks ONLY the rust). Then minimal 'polishing'.
Thanks, JPG! I'm going to have to invest in some Evapo-Rust for this and other projects, although I must admit that I'm intrigued by the potato method I saw a video on, I think linked from another thread on this forum. :D

I restored what was left of about a 230-year-old Brown Bess musket a couple of years ago, and I used a lye bath method to remove the rust on that. It removed the rust without removing the old patina. I had the original lock and barrel for that project. :cool:
Mike Chambers
Franklin County, Missouri

1952 10ER, S/N 59677 (A work in process!)
MichaelCfffg
Gold Member
Posts: 30
Joined: Fri Sep 27, 2024 2:55 pm

Re: My Model 10-ER Journey

Post by MichaelCfffg »

I got curious this evening and put an indicator on the working end of the spindle on my machine. With the belt still on and tensioned correctly, I got just over 0.001 inch of runout, and that could have been attributed to the clearance between the spindle end and the drive spur that was mounted on it.

I then loosened the belt and set up to gently push down on the drive spur then pry up on it from underneath. This revealed a total play of 0.015 inch, not as good as I had hoped. Does anybody have any thoughts on this? Thanks!
Attachments
20240929_222652.jpg
20240929_222652.jpg (62.34 KiB) Viewed 2126 times
Mike Chambers
Franklin County, Missouri

1952 10ER, S/N 59677 (A work in process!)
MichaelCfffg
Gold Member
Posts: 30
Joined: Fri Sep 27, 2024 2:55 pm

Re: My Model 10-ER Journey

Post by MichaelCfffg »

Being from Missouri, I got curious about the two 9-inch table saw blades and mounted one on the machine, followed by the saw table which I had not mounted yet. Sure enough, the blade did not clear the opening in the table, so I took that all off the machine again. Neither of the 9-inch blades appear to be in very good condition, so I'm going to dismount them from their arbors and throw those blades away.

Before I took the table off the machine though, I thought I'd check out the table-raising mechanism to see if that worked okay. The table raising screw did not come anywhere close to touching the table frame where I thought it would hit. I'm attaching a photo of this. What am I missing here, possibly another part? Thanks!
Attachments
20240929_224134.jpg
20240929_224134.jpg (60.92 KiB) Viewed 2126 times
20240929_224212.jpg
20240929_224212.jpg (79.27 KiB) Viewed 2126 times
Mike Chambers
Franklin County, Missouri

1952 10ER, S/N 59677 (A work in process!)
User avatar
JPG
Platinum Member
Posts: 35429
Joined: Wed Dec 10, 2008 7:42 pm
Location: Lexington, Ky (TAMECAT territory)

Re: My Model 10-ER Journey

Post by JPG »

An arm mounts to the table support leg and the screw crank presses against a depression in the other end of the arm. Yep missing a piece. Or it is hiding elsewhere.

FWIW, 8" is the original blade size.
╔═══╗
╟JPG ╢
╚═══╝

Goldie(Bought New SN 377425)/4" jointer/6" beltsander/12" planer/stripsander/bandsaw/powerstation /Scroll saw/Jig saw /Craftsman 10" ras/Craftsman 6" thicknessplaner/ Dayton10"tablesaw(restoredfromneighborstrashpile)/ Mark VII restoration in 'progress'/ 10
E[/size](SN E3779) restoration in progress, a 510 on the back burner and a growing pile of items to be eventually returned to useful life. - aka Red Grange
jpdalton
Gold Member
Posts: 477
Joined: Sun Jun 12, 2011 7:36 am

Re: My Model 10-ER Journey

Post by jpdalton »

MichaelCfffg wrote: Sun Sep 29, 2024 4:45 pm I cringe seeing all that neglect! I'm not in a big hurry, but now that I've started, I'd sure like to start using it. [Sigh!]
The good news is that even these relatively neglected ones can be a diamond in the rough. I managed to get a pretty good looking result on my last 10ER, from a very similar starting point…

viewtopic.php?t=5497&start=250

Keep those pictures coming - and good luck in the project!
John Dalton
Massachusetts
*****************************************
1948 10E, S/N 5052 (restored)
1950 10ER, S/N 26473 (restored)
1952 10ER, S/N R51721 (restored as dedicated drill press)
1954 Mark 5, S/N 263705 (restored/PowerPro)
c1957 Magna-Line Model 710 Bench Saw, S/N 34162 (restored)
User avatar
chapmanruss
Platinum Member
Posts: 4186
Joined: Tue Aug 26, 2014 8:16 pm
Location: near Portland, Oregon

Re: My Model 10-ER Journey

Post by chapmanruss »

Wow, a lot of postings since mine yesterday. The Owner's Guide you have will be fine with very little changed between when your Model 10ER was made and it was published. The only thing of note would be on page 5 ATTACHING MOTOR SWITCH which describes removing the bottom screw of the Name Plate. This is something that can be done with Version 7 Headstocks ONLY since there is no hole behind the Name Plate for earlier Headstock versions. The PDF below is an addendum I made for the Owner's Guide to use paste wax instead of light oil on the metal parts.
.
Waxing Supplement Model 10s.pdf
(113.17 KiB) Downloaded 128 times
.
The 9" Saw Blades were used on early Mark 5 Shopsmith's. As you have discovered the 9" blade is too large in diameter. 8" Saw Blades can be found and with carbide tipped ones they cut very well.

The most common belt used for the Model 10's is a 4L-380 with the most common motor found on them which is an A. O. Smith 1/2 HP Motor. Different motors may have the shaft positioned differently in relationship to the Drive Sleeve Pulley. A 4L-390 Belt is also useful for adding additional speeds as indicated in the chart below.
.
Table of Speeds Model 10s.pdf
(182.91 KiB) Downloaded 100 times
.
A larger motor like the A. O. Smith 3/4HP Motor works better with the 4L-390 Belt.

In looking at the pictures there may be some alignment issues such as the Tie Bar between the ends of the Way Tubes JPG mentioned.

The Cupped Lathe Dead Center is the one that would have come with your Model 10ER originally from the factory and is the same one supplied today with a new Mark 7. New ones have the black oxide coating which began in 1964.

The Drill Chuck mounted on a Moorse Taper is for use in the Tailstock. There is a Moorse Taper Adapter to attach the Shopsmith supplied Drill Chuck to the Tailstock.

The Way Tubes are not stainless steel but are polished steel.

As for rust removal, although the potato method sounds interesting it is very, very slow and there are much better ways. JPG recommend evaporust or electrolysis rust removal. Electrolysis means having the correct items for it. Evaprorust or other chemicals are much easier to use. Evaprorust is quick but costs more and I have also used vinegar which costs less but takes longer about 3 days depending on the amount of rust. Because I have done a lot of Shopsmith restorations I have a PVC Pipe capped on both ends, one fixed the other removable, to de-rust Way (and Bench) Tubes in. Bench Tubes are used on Mark series Shopsmith's.

I have no idea what the two mystery parts that look as if they attach to the spindle are. They are to large for pen turning.

The picture below shows the common Table Raising parts. There were two crank versions and the Arm JPG mentioned is shown too. The arm goes on the front Main Table Post. It is shown in place on page 6 of the Owner's Guide.

_
Table Raising Assembly 142-1X.jpg
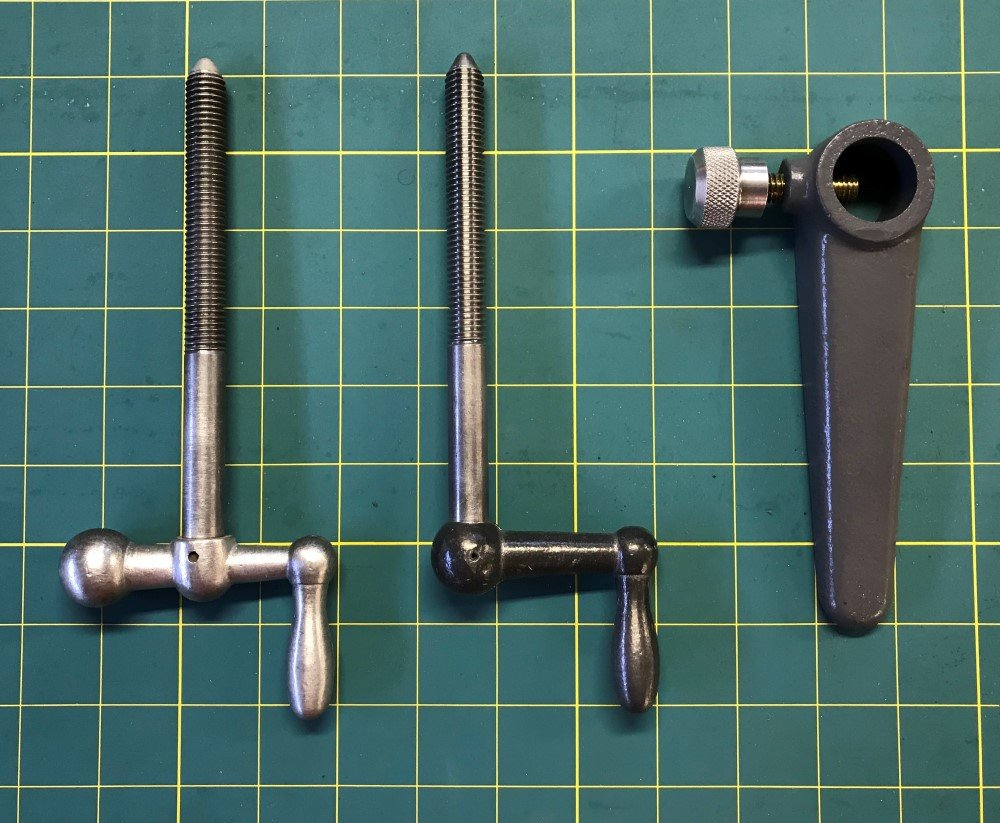
Table Raising Assembly 142-1X.jpg (148 KiB) Viewed 2088 times
.
If you are going to keep the broken Motor Pulley for now, I recommend not using the 2" pulley position. It will wear out the belt much faster.

Near the top of the Maintenance and Repair section is a topic called Everything E / ER - Technical info, documentation, links which has a lot of great repair and restoration information. In the Community section is a Topic I started titled Shopsmith Model 10's What When and Where. It has a lot of information about the Model 10E and 10ER. You can find it at the link below.

viewtopic.php?t=23647

It will be a lot of information to go through, but I believe worth your time.
Russ

Mark V completely upgraded to Mark 7
Mark V 520
All SPT's & 2 Power Stations
Model 10ER S/N R64000 first one I restored on bench w/ metal ends & retractable casters.
Has Speed Changer, 4E Jointer, Jig Saw with lamp, a complete set of original accessories & much more.
Model 10E's S/N's 1076 & 1077 oldest ones I have restored. Mark 2 S/N 85959 restored. Others to be restored.
User avatar
chapmanruss
Platinum Member
Posts: 4186
Joined: Tue Aug 26, 2014 8:16 pm
Location: near Portland, Oregon

Re: My Model 10-ER Journey

Post by chapmanruss »

I thought you might enjoy seeing what can be done in a restoration. Below are pictures before and after of Model 10ER S/N R57376 which is the closest one I restored to yours.

This is how I found it when I went to pick it up

_
R57376 as found.jpg
R57376 as found.jpg (111.57 KiB) Viewed 2085 times
.
Not in very good condition and partially disassembled. The surprise was inside the Headstock. :eek:

_
Inside the Headstock.jpg
Inside the Headstock.jpg (162.39 KiB) Viewed 2085 times
.
The Drive Sleeve, Quill and Pinion Assemblies were all still in place inside this mess. The Quill and Pinion Assemblies had too much rust pitting and had to be replaced. The Drive Sleeve Bearings were also replaced which is common on my restorations. Even being sealed bearings, they are still over 70 years old.

The Main Table didn't look great but did "clean" up pretty well.

_
Main Table before.jpg
Main Table before.jpg (103.23 KiB) Viewed 2085 times
.
Main Table after.jpg
Main Table after.jpg (75.08 KiB) Viewed 2085 times
.
Below is after its restoration. It is on a bench I made since it didn't have a bench when I bought it. It has the Jig Saw and Jointer/Shaper Fence accessories.

_
R57376 restored.jpg
R57376 restored.jpg (97.91 KiB) Viewed 2085 times
Russ

Mark V completely upgraded to Mark 7
Mark V 520
All SPT's & 2 Power Stations
Model 10ER S/N R64000 first one I restored on bench w/ metal ends & retractable casters.
Has Speed Changer, 4E Jointer, Jig Saw with lamp, a complete set of original accessories & much more.
Model 10E's S/N's 1076 & 1077 oldest ones I have restored. Mark 2 S/N 85959 restored. Others to be restored.
Post Reply