Here's some thoughts:
1. The sliding legs are just riding on the bottom of the table. I contemplated putting a sheet of high density plastic on the underside of the table but opted for keeping the edge of the 2x4 the only thing touching - figured the low surface area would keep friction down. The sliding legs are kept in line with the table by strips keeping them from getting "cockeyed" in the underside.
2. The fixed legs are attached to the side bracket and they too touch the underside of the table. Let me explain: The weight of the table wants to flatten out the "scissors". The side brackets trap the fixed leg side although they still want to rotate (flatten out). The upper edge of the fixed side rotates until it contacts the underside of the table. Since both moving and fixed legs are a) the same length, b) pinned at the same height, and c) attached to the same plane (underside of the table) gravity takes care of leveling the table. The only time this would not be the case is if you raised the table high enough that the fixed leg rotates vertical enough that the threaded rod carries the load.
3. I would love to see how the pistol grip works. I thought about it and ruled it out with the following logic: it would raise the table no problem - a bit course perhaps but would raise it no problem. But lowering was a concern - how would I control the table when lowering? Seemed that trying to release the cam trigger while holding 40 lbs of table top was a bit of a death trap. Make no mistake - if not secured well this design will collapse and likely remind you to keep your fingers out of harms way.
I think perhaps a better option would be to fashion a "screw clamp/vice" out of a 48" piece of threaded rod. Nylock/washer, through moving and fixed legs, washer, drill through the threaded rod and put a cotter pin, leave some thread and put on a handle. This should fix the threaded rod between the fixed and moving legs and "pull" the moving legs towards you with a rotation. Probably would work fine but would take a while to adjust the height??
4. I made the table out of 2 sheets of .5" MDF on top of a dado'ed cut torsion box out of 1x2 popular. So what does that make it - 2.5".
Hope this helps.
Outfeed Table
Moderator: admin
-
hudsonmiller
- Gold Member
- Posts: 41
- Joined: Sat Dec 06, 2008 12:27 pm
- Location: Denver, Colorado

Thanks
Yes, that helps. I probably would have seen the issue with lowering the table sooner or later, but your thoughts are correct. That would be a real bummer lowering that thing. Might cut off some fingers!!
I am still having difficulty seeing the way the fixed legs are fastened. Is this where you have the threaded rod running through the legs and the drop piece on the side of the table? Is that rod inside one of the cross members?
Thanks again.
I am still having difficulty seeing the way the fixed legs are fastened. Is this where you have the threaded rod running through the legs and the drop piece on the side of the table? Is that rod inside one of the cross members?
Thanks again.
Saw dust heals many wounds. RLTW
Dave
Dave
-
hudsonmiller
- Gold Member
- Posts: 41
- Joined: Sat Dec 06, 2008 12:27 pm
- Location: Denver, Colorado
You've got it
Yes-
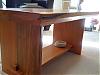
So from one side of the table to the other:
Nylon lock nut, table attachment brace, 2x4 outer leg with hole, 2x4 spreader screwed to outer legs on both sides, 2x4 outer leg with hole, table attachment brace, nylon lock nut. Run threaded rod through the whole mess. It doesn't go through the spreader just close to/against it.
- Attachments
-
- rod detil1.jpg (41.83 KiB) Viewed 5534 times
-
- rod detil2.jpg (45.85 KiB) Viewed 5511 times
Just remember - It's all tool setup.
-
robinson46176

- Platinum Member
- Posts: 4182
- Joined: Mon Mar 09, 2009 9:00 pm
- Location: Central Indiana (Shelbyville)
I bought one of these hospital overbed tables at a yard sale for about $3 and it makes a good outfeed table.
http://www.rehabmart.com/category/Hospital_Bed_Tables.htm
Mine does not tilt but one that would tilt could match the SS tilt table. You could easily clamp a wood fence to one to hold the lower edge of the piece being cut at a tilt. I also want to put locking casters on mine. So far I have just sat it on small blocks.
I also have an old almost antique IV stand and I use it to hold a portable light. It uses very little floor space, weighs a ton but rolls easy and has adjustable height.
--
farmer
Francis Robinson
I did not equip with Shopsmiths in spite of the setups but because of them.
1 1988 - Mark V 510 (bought new), 4 Poly vee 1 1/8th HP Mark V's, Mark VII, 1 Mark V Mini, 1 Frankensmith, 1 10-ER, 1 Mark V Push-me-Pull-me Drillpress, SS bandsaw, belt sander, jointer, jigsaw, shaper attach, mortising attach, TS-3650 Rigid tablesaw, RAS, 6" long bed jointer, Foley/Belsaw Planer/molder/ripsaw, 1" sander, oscillating spindle/belt sander, Scroll saw, Woodmizer sawmill
-
a1gutterman

- Platinum Member
- Posts: 3653
- Joined: Tue Jan 09, 2007 12:45 am
- Location: "close to" Seattle