Don't mangle your zero clearance inserts

This is a forum for intermediate to advanced woodworkers. Show off your projects or share your ideas.

Moderator: admin

User avatar
tdubnik
Platinum Member
Posts: 545
Joined: Wed Nov 12, 2008 8:04 am
Location: Talmo, GA

Don't mangle your zero clearance inserts

Post by tdubnik »

After generally mangling my own zero clearance inserts after using then a few times, I decided to come up with a way to set the blade in the same place every time.

Image

I made a hardwood runner that fit snugly in the left miter slot and then attached a crosspiece that extended past the blade. I then set the table against the headstock bumper and locked it down. Next I extended the quill about 1/8 to 1/4 of an inch and locked it down. Then I cut the crosspiece to length by pushing the miter runner with the cross piece attached through the blade. Now I extended the quill with no table insert and set my zero clearance gauge so that the front teeth of the saw blade would rest against the cross piece when I released the quill. I now tightened the quill and raised the table above the blade.

Image

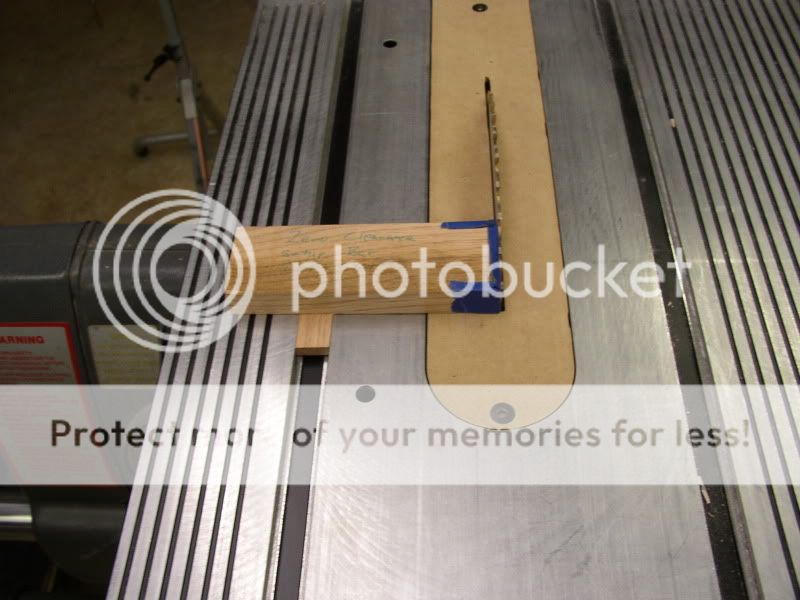
I now inserted a blank table insert and locked it down. I turned on the Shopsmith and lowered the table to make the zero clearance cut. I then raised the table and removed the new insert. I checked the accuracy of my gauge by moving the table and then moving it back against the headstock. I extended the quill and let it come to rest against my zero clearance jig and locked it down. I reinstalled my new zero clearance insert and lowered the table to make sure it would come down with no interferance. As you can see, I shimmed the end of my jig with a couple of tape strips to get the setting just right. Now, when I install my zero clearance insert and use my zero clearance jig, I get a perfect fit. Since I am referencing from the miter slot and not the relation of the table to the headstock, I have not messed up another insert yet.
User avatar
dusty
Platinum Member
Posts: 21481
Joined: Wed Nov 22, 2006 6:52 am
Location: Tucson (Wildcat Country), Arizona

Zero Clearance Inserts, Do Not Mangle Your

Post by dusty »

Fantastic. That is a great idea and equally great execution. I need to make one of those for myself. I don't need to do it real soon because I just finished making a dozen or so ZCIs. I can mangle a few before I run out.

I notice, however, that you made the pictured ZCI such that you can not use your upper saw guard. I hope you will give some thought to extending the kerf back so that the saw guard can be installed.

Your ZCI appears to be made of hardboard (I assume 1/4"). Is that working well for you? I was sort disappointed in mine so I doubled the thickness of the ZCI in the area inside of the table cutout. I have one installed now that was made that way. Jury is still out.
"Making Sawdust Safely"
Dusty
Sent from my Dell XPS using Firefox.
User avatar
tdubnik
Platinum Member
Posts: 545
Joined: Wed Nov 12, 2008 8:04 am
Location: Talmo, GA

Post by tdubnik »

Actually the insert is made from MDF and yes I do need to extend the kerf for the blade guard.

The jig is pretty slick because it is fast and references from the miter slot.
paul heller
Gold Member
Posts: 288
Joined: Thu Jul 20, 2006 7:41 pm
Location: Arvada, CO

Post by paul heller »

tdubnik wrote:After generally mangling my own zero clearance inserts after using then a few times, I decided to come up with a way to set the blade in the same place every time.
So simple, so obvious, yet I would never have thought of it. Thank you.

Paul
User avatar
robinson46176
Platinum Member
Posts: 4182
Joined: Mon Mar 09, 2009 9:00 pm
Location: Central Indiana (Shelbyville)

Post by robinson46176 »

OK, maybe I'm just having a senior moment here but I'm just not seeing the original problem... :confused:
If I were using a zero clearance insert (keep in mind I seldom use my SS as a table saw) I would just extend the quill maybe 1/4" or less and lock it and lock the headstock to the way tubes. Then I would slide the table over so the slot was over the blade and lower the table down over the slot. After wiggling the blade and table by hand to be sure it was all lined up and not dragging on either side I would then lock the table in place on the way tubes. What would not be lined up well at that point? :confused:
--
farmer
Francis Robinson
I did not equip with Shopsmiths in spite of the setups but because of them.
1 1988 - Mark V 510 (bought new), 4 Poly vee 1 1/8th HP Mark V's, Mark VII, 1 Mark V Mini, 1 Frankensmith, 1 10-ER, 1 Mark V Push-me-Pull-me Drillpress, SS bandsaw, belt sander, jointer, jigsaw, shaper attach, mortising attach, TS-3650 Rigid tablesaw, RAS, 6" long bed jointer, Foley/Belsaw Planer/molder/ripsaw, 1" sander, oscillating spindle/belt sander, Scroll saw, Woodmizer sawmill
User avatar
tdubnik
Platinum Member
Posts: 545
Joined: Wed Nov 12, 2008 8:04 am
Location: Talmo, GA

Post by tdubnik »

Francis,

That was pretty much my old method. In my case I would set the table against the headstock and extend the quill until it came through the insert. My problem was that I would get it off just a hair each time until the insert wasn't truly a zero clearance anymore. I would then use a new insert and start the process all over.

I'm just offering an alternative that works for me and MAY help someone else with the same problem.
Gene Howe
Platinum Member
Posts: 3219
Joined: Wed Jul 26, 2006 7:52 pm
Location: Snowflake, AZ

Post by Gene Howe »

I like that idea. Anything to make it easier to align is a good thing. Now, if I just had a foolproof method to insure the headstock was locked...........:eek:
Gene

'The true soldier fights not because he hates what is in front of him, but because he loves what is behind him.' G. K. Chesterton
User avatar
beeg
Platinum Member
Posts: 4791
Joined: Sun Oct 14, 2007 2:33 pm
Location: St. Louis,Mo.

Post by beeg »

Gene Howe wrote: Now, if I just had a foolproof method to insure the headstock was locked...........:eek:

Use the 5 point check before ya turn it on.
EVERYBODY else does.:rolleyes:
SS 500(09/1980), DC3300, jointer, bandsaw, belt sander, Strip Sander, drum sanders,molder, dado, biscuit joiner, universal lathe tool rest, Oneway talon chuck, router bits & chucks and a De Walt 735 planer,a #5,#6, block planes. ALL in a 100 square foot shop.
.
.

Bob
User avatar
tdubnik
Platinum Member
Posts: 545
Joined: Wed Nov 12, 2008 8:04 am
Location: Talmo, GA

Post by tdubnik »

Gene Howe wrote:I like that idea. Anything to make it easier to align is a good thing. Now, if I just had a foolproof method to insure the headstock was locked...........:eek:
Of course, I've PERSONALLY never done that.;)
User avatar
a1gutterman
Platinum Member
Posts: 3653
Joined: Tue Jan 09, 2007 12:45 am
Location: "close to" Seattle

Post by a1gutterman »

beeg wrote:Use the 5 point check before ya turn it on.
EVERYBODY else does.:rolleyes:
What's a "five point check"? Just kidding!!!
Tim

Buying US made products will help keep YOUR job or retirement funds safer.
Post Reply