Hello all.
My name is Dwight from Raleigh, NC and I am new to your forum. I come to you all as I have just acquired a 1958 (I think, gotta check ser. # again) "Greenie" from a family friend in ohio for the staggering price of $20. I'm looking to restore it to a condition somewhere between functional and showroom. In it's current state (pics to come) it is far, far from either. It is very, very rusted as it's been untouched in an Ohio barn for the past 25 years. Even in it's condition, I am very excited to have it as I've been eyeballing a ShopSmith for quite some time.
To start this project, I know I need to tackle the rust issue first and foremost. My question would be which technique to go with. My preference would be to break it all down and have it a sandblasted as there is a professional sandblaster less than a mile from my house and I can get it all done for about $100. That being said, it seems the preferred method of this forum is electrolysis, which I am not opposed to, just not familar with. What are the pros and cons of each of these techniques? Is one more efficient than the other? If it's a matter of level of rust, assume the worst case scenario until I can get some pics up.
The next order of business for me is the guts of the headstock. I haven't opened it up yet, as I only recieved it yesterday, but I assume it's in a similar shape to the rest of the unit. I'm going to do a power test it see if it comes on, but going forward from there, what types of upgrades should I consider? Should I look at the bigger motor? It likely has the 3/4? Would the 1-1/4 be worth while? From there should I ditch the Gilmer drive and upgrade as well? Also, should I upgrade to a double quill from the single? Or just I try and keep everything original? The main use of it once it is complete with be turning and sawing if that helps in assessing the situation.
Finally, any tips tricks, advice and pitfalls from anyone who as tackled something like this before would be greatly appreciated. I'm just really looking forward to getting this American original back on it's feet and restoring a bit of nostaglia. Thank you in advance and I'll get some pics very shortly.
Dwight
A new restoration project...
Moderator: admin
-
ajohnson024
- Silver Member
- Posts: 8
- Joined: Mon Jun 08, 2009 11:55 pm
- Location: Raleigh, NC
-
mbcabinetmaker
- Platinum Member
- Posts: 1627
- Joined: Thu Jul 20, 2006 6:18 am
- Location: Greer SC
-
ajohnson024
- Silver Member
- Posts: 8
- Joined: Mon Jun 08, 2009 11:55 pm
- Location: Raleigh, NC
-
ajohnson024
- Silver Member
- Posts: 8
- Joined: Mon Jun 08, 2009 11:55 pm
- Location: Raleigh, NC
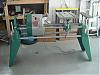
]Well, here she is in all her glory....

(not sure how to embed the pic in the post)
I also have all the orignal attachments such as the lathe tailstock, tables, and assorted arbors. And everything is in the same condition.
Serial # is 325616 which puts her at 1956
She's a beaut i think. Structure is sound with a lot of potential...
Dwight
- Attachments
-
- DSCN0130.JPG (103.79 KiB) Viewed 13157 times
-
- DSCN0131.JPG (105.34 KiB) Viewed 13110 times
-
- DSCN0132.JPG (103.62 KiB) Viewed 13112 times
Dwight - you have a great time ahead of you - my 54 was in about that same state of shape that I found rusting behind our house. Seven Shopsmiths later, I can't think what I'd do without one to work on!
Sandplasting vs electrolysis, in my opinion, is whichever option you are more comfortable with. I sandplasted my Greenie because I had built a sandblaster and was itching for something to use it on! If you take it to someone (and $100 sounds like a great price), make sure he is using something soft such as glass beads. You'll get a better finished product than with coal slag (experience speaking here!).
Search in this forum for a homebuilt lathe version for polishing the tubes. Takes it down to a 10 minute process for each. Only parts you need to buy are pipe end caps (1 1/2" - about $2.50 ea from HD). Stick those into a power drill and hit with some sandpaper. I have found a combination of 100, 150, 220 and 400 wet paper, in that order, makes a smooth, bright finish.
Hammered finish Rustoleum in Verde Green and Gray give the closest-to-original finish. Lots of info on those products on this site.
The upgrades are up to you - depending on how serious you get into woodworking, you may never notice the difference between the runount of a single- vs. double-bearing quill (0.005 vs 0.001 inch). Same with the 3/4 HP motor you've got. Advantage of the 3/4HP is it draws fewer amps, meaning less chance of blowing a circuit on 15A service or melting out the sometimes inadequate power switch in the headstock. After pulling apart the headstock, if the gilmer belt is in good shape, I'd leave it alone. Just my opinion.
Have fun, and look forward to seeing the updates. You're on a great site with lots of info on this great machine!
Matt
Lost count, over a dozen rebuilt/repaired/restored
Personal equipment: 510 made in 1993, belt sander, jig saw, band saw, planer and jointer
Matt in GA
Personal equipment: 510 made in 1993, belt sander, jig saw, band saw, planer and jointer
Matt in GA
-
ajohnson024
- Silver Member
- Posts: 8
- Joined: Mon Jun 08, 2009 11:55 pm
- Location: Raleigh, NC
Matt,
Thanks for the info. Much appreciated. Great tip on the sandblasting media. I hadn't thought of it but it makes perfect sense.
I've seen the tutorials on "lathing" the tubes and I am going to go with that technique. Specific sand paper grit was a bonus piece of info.
In terms of the upgrades, I am by no means a serious woodworker so it sounds like the upgrades are not a necessity.
I'm going to begin breaking it down this weekend and hopefully have the big stuff blasted by the following weekend while I work on cleaning up the small stuff.
Thanks again.
Dwight

Good luck with your project! I hope you find restoring these old machines as fun and rewarding as some of the rest of us do.
My only recommendation right now is to study this thread: https://forum.shopsmith.com/viewtopic.php?t=3078 In that thread, MickyD goes into great detail about the restoration of his Greenie and how he brought his back to life. It's a lot to read, but the end result of his work is quite amazing.
My only recommendation right now is to study this thread: https://forum.shopsmith.com/viewtopic.php?t=3078 In that thread, MickyD goes into great detail about the restoration of his Greenie and how he brought his back to life. It's a lot to read, but the end result of his work is quite amazing.
-
JPG

- Platinum Member
- Posts: 35598
- Joined: Wed Dec 10, 2008 7:42 pm
- Location: Lexington, Ky (TAMECAT territory)
I would not sand blast the way tubes. These are the upper set of tubes upon which the headstock and table carriage slide. They appear to be in very good condition. Search on this forum for 'evaporust' for an alternative to electrolysis of the tubes. SEE link below
The only need to sand blast is the sheet metal and the bench(lower) tubes. This is only so as to prepare them for painting. I would use paint remover(citrusstrip works well on aluminum castings etc. as long as you can give it time to work).
Do not overlook priming the INSIDE of the castings. It really improves the appearance when you have to 'get in there' and does guard against any corrosion. The end caps have steel clamps which are prone to rust(and out of sight).
Depending upon the condition of the drive system an upgrade is really NOT necessary unless you have to replace a part of it anyway. An item if concern is the gilmer clutch. I refer you to the thread already suggested for further details. This thread will also be of interest. http://www.shopsmith.net/forums/showthr ... mer+clutch
A new bearing in the quill will probably be adequate and much cheaper than a quill upgrade. If you intend to do heavy faceplate turning, you may want to upgrade.
A wire brush works well for removing rust from the arbors etc. Wax them after cleaning so as to reduce future rusting. I believe the non-rusted condition of the way tubes is due to a previous owner liberally waxing them.
BTW I believe the bench tubes are 1 7/8" OD and will require a different size "plug" aka chuck.
This link will be of interest to you. Also check out the links therein. https://forum.shopsmith.com/viewtopic.php?t=3466
All this IS a bit overwhelming, BUT now is the time to absorb it and make your own decisions as how YOU will proceed!:)
Good Luck with your "Project".
Corrected 'gilmer' link
╔═══╗
╟JPG ╢
╚═══╝
Goldie(Bought New SN 377425)/4" jointer/6" beltsander/12" planer/stripsander/bandsaw/powerstation /Scroll saw/Jig saw /Craftsman 10" ras/Craftsman 6" thicknessplaner/ Dayton10"tablesaw(restoredfromneighborstrashpile)/ Mark VII restoration in 'progress'/ 10E[/size](SN E3779) restoration in progress, a 510 on the back burner and a growing pile of items to be eventually returned to useful life. - aka Red Grange
I thought mine was rough, but yours makes it look like I started in ok shape.
https://forum.shopsmith.com/viewtopic.php?t=3674
I sand blasted everything that gets painted. I worked the tubes over on a lathe. I worked the tables and bright work over with a wirebrush on a grinder stand. I need to update my post and will try to do that later today.
Mike
https://forum.shopsmith.com/viewtopic.php?t=3674
I sand blasted everything that gets painted. I worked the tubes over on a lathe. I worked the tables and bright work over with a wirebrush on a grinder stand. I need to update my post and will try to do that later today.
Mike
Mike......... Rowlett, Texas, near Dallas
86 MK V 500/520. 59 MK 5 Greenie Shorty. SS Jointer, SS Planer,
SS Bandsaw, SS Lathe duplicator, SS Belt Sander,SS Molder & Shaper,
SS Tenon master jig, SS Mortising kit, SS 2 1/4' Drum Sanders, Ringmaster, DC3300....
86 MK V 500/520. 59 MK 5 Greenie Shorty. SS Jointer, SS Planer,
SS Bandsaw, SS Lathe duplicator, SS Belt Sander,SS Molder & Shaper,
SS Tenon master jig, SS Mortising kit, SS 2 1/4' Drum Sanders, Ringmaster, DC3300....
