I bought the zoom spout oiler for the sole purpose of lubricating the bearings on the floating sheaves, but there are no holes in either sheave’s sleeves. According to the serial number, this ShopSmith was made in October 1955. Do these bearings not require lubrication? Here is what it says in the owner’s manual:
BEARINGS – All spindle bearings are grease sealed and require no lubrication for the life of the machine.
I also could not remove the quill to wax/lubricate it. Is the quill in this machine not designed to be removed?
Again, here is what it says in the owner’s manual:
QUILL – Lock quill in maximum extended position. Apply light coat of grease (Magna Lube) to rack teeth. Place a few drops of oil on top surface of quill and run quill in and out several time to spread the oil.
Sincerely,
Ron
No oiling holes?
Moderator: admin

No oiling holes?
Yes, The sheaves do need lubication. They are not bearings as they only slide on a shaft, not rotate on the shaft. The drive sleeve and idler shaft has sealed bearings that do not need lubication.
I find the Greenies I rebuild do not have an oil hole in the control or floating sheaves. I drill a 5/32" hole on the keyway 3/16" from the raised collar on both sheaves. Since I cannot get to the control sheave to oil it, I drill a 3" hole (metal hole saw) centered between the holes that hold the LOGO cover. I have a jig I made for centering the hole. I then use a 3/4" wide flat aluminum bracket the length of the LOGO diameter with a hole drilled at the top and bottom of the LOGO cover and matching holes in the bracket. I use 2 #8 sheet metal screws to hold the logo cover to the bracket. This allows me to oil the control sheave and blow sawdust from the headstock during maintenance checkups.
All quill housings can be removed. There is a set screw about 1" in on top the may have filler in it so you cannot see it at first glance. Dig the filler out with a small prick or screwdriver and loose the 5/32" set screw. Keep a tight grip on the quill advance handle as you remove the quill housing and let it slowly unwind. When installing you need to go 2 1/2-3 turns CW before installing the quill housing. If you do remove the quill housing, I use plenty of good wheel bearing grease on the end of the splined end of the shaft to get lubication into the drive sleeve housing. If you are not having any problems with extending or retracting the quill, play in the shaft or loud noise from the top of the housing, what you did should for the quill housing will be good until the next time for lubication.
Ron309753 wrote:I bought the zoom spout oiler for the sole purpose of lubricating the bearings on the floating sheaves, but there are no holes in either sheave’s sleeves. According to the serial number, this ShopSmith was made in October 1955. Do these bearings not require lubrication? Here is what it says in the owner’s manual:
BEARINGS – All spindle bearings are grease sealed and require no lubrication for the life of the machine.
I also could not remove the quill to wax/lubricate it. Is the quill in this machine not designed to be removed?
Again, here is what it says in the owner’s manual:
QUILL – Lock quill in maximum extended position. Apply light coat of grease (Magna Lube) to rack teeth. Place a few drops of oil on top surface of quill and run quill in and out several time to spread the oil.
Sincerely,
Ron
Bill Mayo bill.mayo@verizon.net
Shopsmith owner since 73. Sell, repair and rebuild Shopsmith, Total Shop & Wood Master headstocks, SPTs, attachments, accessories and parts. US Navy 1955-1975 (FTCS/E-8)
Shopsmith owner since 73. Sell, repair and rebuild Shopsmith, Total Shop & Wood Master headstocks, SPTs, attachments, accessories and parts. US Navy 1955-1975 (FTCS/E-8)
Bill,
Thanks! Great info as usual. I’ve been studying the drawings in the back of the owner’s manual and I think I understand now about the sheaves and the bearings. These may sound like dumb questions, but I assume that before you drill them, you must remove the floating sheave from the motor shaft and the control sheave from the idler shaft? For that to happen it looks like you would have to remove the spring, spring case, and the retaining ring from the motor shaft. If so, what do you use to compress the spring so you can get the ring off, and then back on again?
My greenie has an access hole under the logo cover.
I also figured out what the issue was with the quill. There was so much sawdust compacted in the gear that the last few teeth on the quill would not engage. When I cleaned that out I was able to remove the quill.
Ron
-
dusty

- Platinum Member
- Posts: 21530
- Joined: Wed Nov 22, 2006 6:52 am
- Location: Tucson (Wildcat Country), Arizona
No oiling holes?
If you haven't already done so, you might want to watch Sawdust Session #22, "SS Reborn #2". I've watched this three times already. Now all I need is a headstock to tear down. Shopsmith better lay in some parts for the surge of rebuilds.
In this one, Nick gets down to the point you will have to go to drill your holes.
http://www.shopsmithacademy.com/SS_Archives/SS122/SS122_Common_files/Blackboard_images/Inspection_and_Cleaning.pdf
http://www.shopsmithacademy.com/SS_Archives/SS122/SS122_Shopsmith_Reborn_Pt2.htm
In this one, Nick gets down to the point you will have to go to drill your holes.
http://www.shopsmithacademy.com/SS_Archives/SS122/SS122_Common_files/Blackboard_images/Inspection_and_Cleaning.pdf
http://www.shopsmithacademy.com/SS_Archives/SS122/SS122_Shopsmith_Reborn_Pt2.htm
"Making Sawdust Safely"
Dusty
Sent from my Dell XPS using Firefox.
Dusty
Sent from my Dell XPS using Firefox.
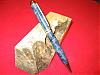
Zoom Oiler - extends 14" from hand.
Finally, found a Zoom Oiler, that started this post. It has a 14" extension oiling tube. The one pictured is available on AMAZON. The one that I found, is the same container w/Turbine oil. Turbine oil: Paraffin base, non-gumming, rust & oxidation inhibited, withstands high temperaures. This one was at a ACE Hardeware in Gig Harbor, WA.
[ATTACH]2455[/ATTACH]
[ATTACH]2455[/ATTACH]
- Attachments
-
- Turbine oiler.jpg (14.79 KiB) Viewed 7318 times
-
- zoom spout.jpg (16.9 KiB) Viewed 7814 times
MK V 520; MK V 510 w/PP DIY Upgrade; MK 5 500; Jointer; Bandsaw; Sliding Table; Conical Sanding Disk; Sharpening Guide, Lathe Duplicator, Jigsaw, Scrollsaw, Beltsander, Ring Master, Biscuit Joiner.
-
terrydowning

- Platinum Member
- Posts: 1678
- Joined: Mon Jul 19, 2010 3:26 pm
- Location: Windsor, CO
Photos of this would be very helpful. Do any exist?billmayo wrote: I find the Greenies I rebuild do not have an oil hole in the control or floating sheaves. I drill a 5/32" hole on the keyway 3/16" from the raised collar on both sheaves. Since I cannot get to the control sheave to oil it, I drill a 3" hole (metal hole saw) centered between the holes that hold the LOGO cover. I have a jig I made for centering the hole. I then use a 3/4" wide flat aluminum bracket the length of the LOGO diameter with a hole drilled at the top and bottom of the LOGO cover and matching holes in the bracket. I use 2 #8 sheet metal screws to hold the logo cover to the bracket. This allows me to oil the control sheave and blow sawdust from the headstock during maintenance checkups.
--
Terry
Copy and paste the URLs into your browser if you want to see the photos.
1955 Shopsmith Mark 5 S/N 296860 Workshop and Tools
https://1drv.ms/i/s!AmpX5k8IhN7ahFCo9VvTDsCpoV_g
Public Photos of Projects
http://sdrv.ms/MaXNLX
Terry
Copy and paste the URLs into your browser if you want to see the photos.
1955 Shopsmith Mark 5 S/N 296860 Workshop and Tools
https://1drv.ms/i/s!AmpX5k8IhN7ahFCo9VvTDsCpoV_g
Public Photos of Projects
http://sdrv.ms/MaXNLX
-
JPG

- Platinum Member
- Posts: 35598
- Joined: Wed Dec 10, 2008 7:42 pm
- Location: Lexington, Ky (TAMECAT territory)
Check the links in post #4. Moving pix no less!:)terrydowning wrote:Photos of this would be very helpful. Do any exist?
╔═══╗
╟JPG ╢
╚═══╝
Goldie(Bought New SN 377425)/4" jointer/6" beltsander/12" planer/stripsander/bandsaw/powerstation /Scroll saw/Jig saw /Craftsman 10" ras/Craftsman 6" thicknessplaner/ Dayton10"tablesaw(restoredfromneighborstrashpile)/ Mark VII restoration in 'progress'/ 10E[/size](SN E3779) restoration in progress, a 510 on the back burner and a growing pile of items to be eventually returned to useful life. - aka Red Grange
-
terrydowning
- Platinum Member
- Posts: 1678
- Joined: Mon Jul 19, 2010 3:26 pm
- Location: Windsor, CO
JPG40504 wrote:Check the links in post #4. Moving pix no less!:)
Being able to print the photo/diagram of exactly where to drill the holes and take out to the shop would still be helpful.
--
Terry
Copy and paste the URLs into your browser if you want to see the photos.
1955 Shopsmith Mark 5 S/N 296860 Workshop and Tools
https://1drv.ms/i/s!AmpX5k8IhN7ahFCo9VvTDsCpoV_g
Public Photos of Projects
http://sdrv.ms/MaXNLX
Terry
Copy and paste the URLs into your browser if you want to see the photos.
1955 Shopsmith Mark 5 S/N 296860 Workshop and Tools
https://1drv.ms/i/s!AmpX5k8IhN7ahFCo9VvTDsCpoV_g
Public Photos of Projects
http://sdrv.ms/MaXNLX
-
RobertTaylor
- Platinum Member
- Posts: 569
- Joined: Mon Sep 03, 2007 9:28 am
- Location: North Canton, Ohio
there really is no exact place to drill the holes. anywhere on either of the sheaves will work. the idea is to get oil on the shaft so that the sheave will move easily. in fact you don't need to drill holes at all if you like to do extra work every time you want to do maintenance. also if you don't want to make your machine last indefinately don't oil the sheaves at all. when you order new parts they will be drilled already from the factory.
Bob
1954 greenie, 1963 anniversary edition now a mini,
1984 500, 1985 510, 1987 510, pro-planer, bandsaw, dust collector
1954 greenie, 1963 anniversary edition now a mini,
1984 500, 1985 510, 1987 510, pro-planer, bandsaw, dust collector