PTWFE Jig challange
Moderator: admin
-
easterngray
- Platinum Member
- Posts: 720
- Joined: Sun Mar 11, 2007 8:28 pm
- Location: Cape Cod MA.
-
shipwright

- Platinum Member
- Posts: 1165
- Joined: Tue Dec 15, 2009 7:28 pm
- Location: Vancouver Island, Canada
- Contact:
-
easterngray
- Platinum Member
- Posts: 720
- Joined: Sun Mar 11, 2007 8:28 pm
- Location: Cape Cod MA.
-
JPG

- Platinum Member
- Posts: 35598
- Joined: Wed Dec 10, 2008 7:42 pm
- Location: Lexington, Ky (TAMECAT territory)
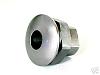
Blade holder
Do not know if this or something similar is in PTWFE, but is is a jig.
Although I had previously make a crude holder to sharpen jointer blades, my recent acquisition of a planer made a more concise/ridgid version necessary. It closely resembles the ss alum version(so much for originality).
It is made from a piece of white oak firewood that I picked up after noticing the fine straightness of the grain.(too good to use for warmth or atmosphere:eek:). The handles are black walnut turned from a cutoff scrap.
The blade slot is cut to a 45. When used, the table is set to -1 degree.(hindsight would suggest cutting the 45 to 46(or 44) to begin with) That with the 3+- degree conical disk angle yields a 43 degree bevel on the blade(that is what was the original angle as received). The PO indicated he had never had them ground.
Although I do not have one, a micro adjustable collar to lower the table incrementally would be an advantage. That would allow increasing the grind depth by lowering the table(and blade) further into the lower portion of the taper on the disk.
It is convenient to act as a holder for honing as well.
The rough corners are there since I did not dress them out fully when jointing them out of the firewood. They are in a non-functional area and I did not want to reduce its size further.
The chamfer was included to eliminate any debris interference.(probably unneeded).
Although I had previously make a crude holder to sharpen jointer blades, my recent acquisition of a planer made a more concise/ridgid version necessary. It closely resembles the ss alum version(so much for originality).
It is made from a piece of white oak firewood that I picked up after noticing the fine straightness of the grain.(too good to use for warmth or atmosphere:eek:). The handles are black walnut turned from a cutoff scrap.
- blade holder 5.jpg (73.09 KiB) Viewed 5332 times
- blade holder 2.jpg (74.09 KiB) Viewed 5329 times
- blade holder 3.jpg (71.65 KiB) Viewed 5328 times
- blade holder 4.jpg (100.59 KiB) Viewed 5331 times
Although I do not have one, a micro adjustable collar to lower the table incrementally would be an advantage. That would allow increasing the grind depth by lowering the table(and blade) further into the lower portion of the taper on the disk.
It is convenient to act as a holder for honing as well.
The rough corners are there since I did not dress them out fully when jointing them out of the firewood. They are in a non-functional area and I did not want to reduce its size further.
The chamfer was included to eliminate any debris interference.(probably unneeded).
Last edited by JPG on Wed Mar 02, 2016 7:41 pm, edited 1 time in total.
╔═══╗
╟JPG ╢
╚═══╝
Goldie(Bought New SN 377425)/4" jointer/6" beltsander/12" planer/stripsander/bandsaw/powerstation /Scroll saw/Jig saw /Craftsman 10" ras/Craftsman 6" thicknessplaner/ Dayton10"tablesaw(restoredfromneighborstrashpile)/ Mark VII restoration in 'progress'/ 10E[/size](SN E3779) restoration in progress, a 510 on the back burner and a growing pile of items to be eventually returned to useful life. - aka Red Grange
In my neverending quest to fight dust and chips I came up with this to hold a flexible stay put dust collection hose. I had previously tried various methods (wire, tape or clamps) to hold the hose. They didn't work very well so it was time to do something a little more stable.
It worked great when I was drilling out the waste for router trays capturing about 95% of the chips generated. It can also be clamped to other tools such as the oscillating sander to catch the dust that escapes from the built in port. I also clamp it to my workbench when I use my dremel tool. While not 100% there is a noticable improvement.
[ATTACH]11100[/ATTACH]
[ATTACH]11101[/ATTACH]
[ATTACH]11102[/ATTACH]
- Attachments
-
- jig1.jpg (82.46 KiB) Viewed 5225 times
-
- jig2.jpg (103.2 KiB) Viewed 5225 times
-
- jig3.jpg (96.23 KiB) Viewed 5222 times
-
easterngray
- Platinum Member
- Posts: 720
- Joined: Sun Mar 11, 2007 8:28 pm
- Location: Cape Cod MA.

Awesome Wheel Guard
Alec,
Great job on the wheel guard. That looks to be some excellent joinery and a very handy accessory. Why so wide? I noticed your auxiliary feather board fence still wasn't finished. I found several coats of standard poly smoothed out with fine steel wool makes a very slick surface that resists becoming tacky against the skin. But it also changes the dimensions of the work surface.
Great job on the wheel guard. That looks to be some excellent joinery and a very handy accessory. Why so wide? I noticed your auxiliary feather board fence still wasn't finished. I found several coats of standard poly smoothed out with fine steel wool makes a very slick surface that resists becoming tacky against the skin. But it also changes the dimensions of the work surface.
-
JPG
- Platinum Member
- Posts: 35598
- Joined: Wed Dec 10, 2008 7:42 pm
- Location: Lexington, Ky (TAMECAT territory)
ddvann79 wrote:Alec,
Great job on the wheel guard. That looks to be some excellent joinery and a very handy accessory. Why so wide? I noticed your auxiliary feather board fence still wasn't finished. I found several coats of standard poly smoothed out with fine steel wool makes a very slick surface that resists becoming tacky against the skin. But it also changes the dimensions of the work surface.
I have found paste finishing wax(minwax) to be an excellent covering. It is slightly 'stiffer' than JPW and still provides the 'slick' when buffed.
FWIW I bought it by mistake(the can be yellow!). Use it whenever I can.(too 'frugal':D to not use it) It is a dark color(walnut) and works well on black oxide parts!
╔═══╗
╟JPG ╢
╚═══╝
Goldie(Bought New SN 377425)/4" jointer/6" beltsander/12" planer/stripsander/bandsaw/powerstation /Scroll saw/Jig saw /Craftsman 10" ras/Craftsman 6" thicknessplaner/ Dayton10"tablesaw(restoredfromneighborstrashpile)/ Mark VII restoration in 'progress'/ 10E[/size](SN E3779) restoration in progress, a 510 on the back burner and a growing pile of items to be eventually returned to useful life. - aka Red Grange
╟JPG ╢
╚═══╝
Goldie(Bought New SN 377425)/4" jointer/6" beltsander/12" planer/stripsander/bandsaw/powerstation /Scroll saw/Jig saw /Craftsman 10" ras/Craftsman 6" thicknessplaner/ Dayton10"tablesaw(restoredfromneighborstrashpile)/ Mark VII restoration in 'progress'/ 10E[/size](SN E3779) restoration in progress, a 510 on the back burner and a growing pile of items to be eventually returned to useful life. - aka Red Grange
-
easterngray
- Platinum Member
- Posts: 720
- Joined: Sun Mar 11, 2007 8:28 pm
- Location: Cape Cod MA.