Awhile ago I bought an old greenie head just in case it would come in handy and finally used parts from it ( mostly speed control) to fix up that $50 SS500 as my second machine. I had a repairable carriage and a spare 500 table left over, so I decided to cobble up a dedicated drill press by getting a hinged base and way tie bar off ebay. I liked how Bill Mayo did his, seen here:
http://www.shopsmith.net/forums/showpos ... tcount=113
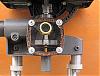
Bill reversed the hinged base, allowing the drill press to hinge forward for access. You have to land the upper end of the way tubes on a support if you want it horizontal. Here is my version:
[ATTACH]11232[/ATTACH]
I left the old head as bare aluminum after stripping off the remaining green paint.
[ATTACH]11233[/ATTACH]
I powered it with a 1 hp, 2400rpm dc treadmill motor, rectifier and router speed control.
[ATTACH]11234[/ATTACH]
The motor is just mounted to a piece of 3/4" plywood, cut to fit inside the al. casing. I used a 6" pulley on the idler shaft and a 2" on the dc motor. It runs fine with a good range of speed, but is noisy. Probably the old bearings in the head need replacing. It drills fine so is good enough for now.
[ATTACH]11235[/ATTACH]
I am trying out a drill press table from Busy Bee on top of the SS table but a little use to date does not show much (or any) advantage.
dedicated SS drill press
Moderator: admin
dedicated SS drill press
- Attachments
-
- IMG_1328.JPG (65.92 KiB) Viewed 14919 times
-
- IMG_1322.JPG (91.49 KiB) Viewed 14802 times
-
- IMG_1321.JPG (96.48 KiB) Viewed 14834 times
-
- IMG_1320.JPG (94.61 KiB) Viewed 14856 times
Peter
a 510,a Mini, dedicated SS drillpress, SS spt's, home made SS belt grinder, SS piston air system, Southbend 10k lathe, mill/drill, Taig
a 510,a Mini, dedicated SS drillpress, SS spt's, home made SS belt grinder, SS piston air system, Southbend 10k lathe, mill/drill, Taig
Here are two more pictures showing the hinged base and Busy Bee table mounting:
[ATTACH]11241[/ATTACH]
The base is fastened to the bench top by two studs screwed up into the threaded holes in the base that usually accept the bolts for the frame tube clamp, and by a L bracket in the middle rear of the base.
[ATTACH]11242[/ATTACH]
[ATTACH]11241[/ATTACH]
The base is fastened to the bench top by two studs screwed up into the threaded holes in the base that usually accept the bolts for the frame tube clamp, and by a L bracket in the middle rear of the base.
[ATTACH]11242[/ATTACH]
- Attachments
-
- IMG_1324.JPG (75.08 KiB) Viewed 14770 times
-
- IMG_1327.JPG (99.54 KiB) Viewed 14785 times
Peter
a 510,a Mini, dedicated SS drillpress, SS spt's, home made SS belt grinder, SS piston air system, Southbend 10k lathe, mill/drill, Taig
a 510,a Mini, dedicated SS drillpress, SS spt's, home made SS belt grinder, SS piston air system, Southbend 10k lathe, mill/drill, Taig
-
JPG

- Platinum Member
- Posts: 35600
- Joined: Wed Dec 10, 2008 7:42 pm
- Location: Lexington, Ky (TAMECAT territory)
Very nice adaptation. The Gilmer appears to be riding high on the main shaft pulley. Try sliding the idler shaft into the headstock further(those clips are a pita and tend to cause you to mis-position the idler shaft(out)).
╔═══╗
╟JPG ╢
╚═══╝
Goldie(Bought New SN 377425)/4" jointer/6" beltsander/12" planer/stripsander/bandsaw/powerstation /Scroll saw/Jig saw /Craftsman 10" ras/Craftsman 6" thicknessplaner/ Dayton10"tablesaw(restoredfromneighborstrashpile)/ Mark VII restoration in 'progress'/ 10E[/size](SN E3779) restoration in progress, a 510 on the back burner and a growing pile of items to be eventually returned to useful life. - aka Red Grange
jpg, thanks for the advice and kind comment. I had not noticed the belt rubbing. Bill Mayo noted the same in a pm, so I took a look a few hours ago. The clips and bolt look like they were never removed, but came off after some careful wrenching. I tapped the idler shaft in a bit but the clips won't go on again, so I will make a new pair tomorrow, with the mounting hole moved a 1/16". This fix might cut down on some belt noise I hear too. I found some good info in this post:
http://www.shopsmith.net/forums/showthr ... t+tracking
http://www.shopsmith.net/forums/showthr ... t+tracking
Peter
a 510,a Mini, dedicated SS drillpress, SS spt's, home made SS belt grinder, SS piston air system, Southbend 10k lathe, mill/drill, Taig
a 510,a Mini, dedicated SS drillpress, SS spt's, home made SS belt grinder, SS piston air system, Southbend 10k lathe, mill/drill, Taig
-
JPG
- Platinum Member
- Posts: 35600
- Joined: Wed Dec 10, 2008 7:42 pm
- Location: Lexington, Ky (TAMECAT territory)
At first I thought Bill was bonkers re removing the clips. I now know he was correct. My experience with the sand cast headstocks is that the clips do NOT position the idlershaft far enough into the headstock to align the belt properly-same thing if a poly-v belt is being used.prmindartmouth wrote:jpg, thanks for the advice and kind comment. I had not noticed the belt rubbing. Bill Mayo noted the same in a pm, so I took a look a few hours ago. The clips and bolt look like they were never removed, but came off after some careful wrenching. I tapped the idler shaft in a bit but the clips won't go on again, so I will make a new pair tomorrow, with the mounting hole moved a 1/16". This fix might cut down on some belt noise I hear too. I found some good info in this post:
https://forum.shopsmith.com/viewtopic.php?t=5240&page=2&highlight=Gilmer+belt+tracking
╔═══╗
╟JPG ╢
╚═══╝
Goldie(Bought New SN 377425)/4" jointer/6" beltsander/12" planer/stripsander/bandsaw/powerstation /Scroll saw/Jig saw /Craftsman 10" ras/Craftsman 6" thicknessplaner/ Dayton10"tablesaw(restoredfromneighborstrashpile)/ Mark VII restoration in 'progress'/ 10E[/size](SN E3779) restoration in progress, a 510 on the back burner and a growing pile of items to be eventually returned to useful life. - aka Red Grange
╟JPG ╢
╚═══╝
Goldie(Bought New SN 377425)/4" jointer/6" beltsander/12" planer/stripsander/bandsaw/powerstation /Scroll saw/Jig saw /Craftsman 10" ras/Craftsman 6" thicknessplaner/ Dayton10"tablesaw(restoredfromneighborstrashpile)/ Mark VII restoration in 'progress'/ 10E[/size](SN E3779) restoration in progress, a 510 on the back burner and a growing pile of items to be eventually returned to useful life. - aka Red Grange
I could not wait so I made a new clip, about as thick as two of the originals and carefully tightened the bolt through the ears. WOW, what a difference. The drill is running very smoothly now. Thanks for your advice. I will keep an eye on the idler shaft to check if it is creeping out. Here is a picture showing the belt running further from the casing:
[ATTACH]11248[/ATTACH]
[ATTACH]11248[/ATTACH]
- Attachments
-
- IMG_1329.JPG (95.66 KiB) Viewed 14729 times
Peter
a 510,a Mini, dedicated SS drillpress, SS spt's, home made SS belt grinder, SS piston air system, Southbend 10k lathe, mill/drill, Taig
a 510,a Mini, dedicated SS drillpress, SS spt's, home made SS belt grinder, SS piston air system, Southbend 10k lathe, mill/drill, Taig

Now that case wood be REALLY PETTY all shined up.
SS 500(09/1980), DC3300, jointer, bandsaw, belt sander, Strip Sander, drum sanders,molder, dado, biscuit joiner, universal lathe tool rest, Oneway talon chuck, router bits & chucks and a De Walt 735 planer,a #5,#6, block planes. ALL in a 100 square foot shop.
.
.
Bob
.
.
Bob
-
JPG
- Platinum Member
- Posts: 35600
- Joined: Wed Dec 10, 2008 7:42 pm
- Location: Lexington, Ky (TAMECAT territory)
But then he would have to wear tinted(sun glasses) safety glasses!;)beeg wrote:Now that case wood be REALLY PETTY all shined up.
╔═══╗
╟JPG ╢
╚═══╝
Goldie(Bought New SN 377425)/4" jointer/6" beltsander/12" planer/stripsander/bandsaw/powerstation /Scroll saw/Jig saw /Craftsman 10" ras/Craftsman 6" thicknessplaner/ Dayton10"tablesaw(restoredfromneighborstrashpile)/ Mark VII restoration in 'progress'/ 10E[/size](SN E3779) restoration in progress, a 510 on the back burner and a growing pile of items to be eventually returned to useful life. - aka Red Grange
╟JPG ╢
╚═══╝
Goldie(Bought New SN 377425)/4" jointer/6" beltsander/12" planer/stripsander/bandsaw/powerstation /Scroll saw/Jig saw /Craftsman 10" ras/Craftsman 6" thicknessplaner/ Dayton10"tablesaw(restoredfromneighborstrashpile)/ Mark VII restoration in 'progress'/ 10E[/size](SN E3779) restoration in progress, a 510 on the back burner and a growing pile of items to be eventually returned to useful life. - aka Red Grange
Electrical
Can you explain the electrical portion of this setup? I see the router speed control, but what is a rectifier and where is it located. It looks like a great setup.
ctxman, Thanks for your question. I am not an electrician so use at your own risk. My understanding is that the router speed control only controls a motor having brushes. It puts out ac , so to run a dc treadmill motor, the output is connected to the rectifier, which converts ac to dc. The rectifier is located here:
[ATTACH]11261[/ATTACH]
It is held to the plywood by a central screw. It will be better for heat disipation when I move it to the metal plate that mounts the speed control.
So, the electrical path is router speed control to rectifier to dc motor. My setup works ok but seems hard on the brushes ( some sparking). I used what I had available, but I am looking out for a cheap treadmill with a good properly designed controller board and motor to use instead.
- Attachments
-
- rectifier location.jpg (82.54 KiB) Viewed 14667 times
Peter
a 510,a Mini, dedicated SS drillpress, SS spt's, home made SS belt grinder, SS piston air system, Southbend 10k lathe, mill/drill, Taig
a 510,a Mini, dedicated SS drillpress, SS spt's, home made SS belt grinder, SS piston air system, Southbend 10k lathe, mill/drill, Taig