Page 3 of 4

Re: Dedicated Drill Press

Posted: Mon Aug 17, 2020 3:46 pm
by edma194
Very nice machine. Can it tap? I'd love that right now.

Re: Dedicated Drill Press

Posted: Tue Aug 18, 2020 2:14 pm
by edma194
Trying the picture again.

Aluminum castings are painted. Legs have rust touched up. Headstock is from 510. Picture taken after drilling lock plates for Sawsmith table saw.

Re: Dedicated Drill Press

Posted: Wed May 12, 2021 5:32 pm
by edma194
Following up on this project with some changes to the table.

500 tables in Drill Press Mode need additional support. I started with the simplest approach by using the extension table as a table support as shown in the picture above. This makes it hard to adjust the table position forward and back using the Table Height Adjustment because the table trunnions interfere with the wide top of the extension table. To adjust the table position you have to lower the extension table then move the table into place, then raise the extension table again until it stops against something. And then you have to re-level the table if you want your holes to be vertical.

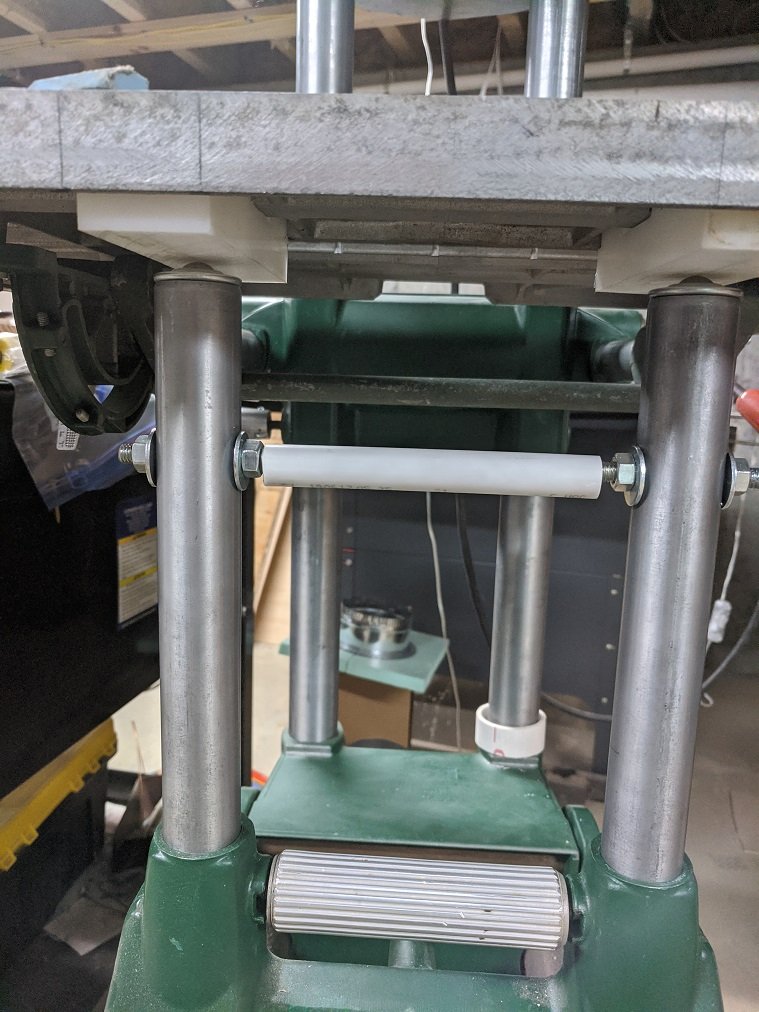
To take care of this I pulled the legs from the extension table by heating the aluminum table bracket with a heat gun and knocking the tubes out. I then drilled through both tubes and joined them with a piece of 5/8" threaded rod. 5/8" rod was the ideal size to use because I already had some.

At the top of the tubes I inserted Load Transfer Ball Bearings. These came from Amazon, $16.99/dozen. The bearing bodies are supported on top of the tubes by their own flange but the diameter of the bearing body under the flange is slightly less than the inside diameter of the extension tubes so I wrapped electrical tape around them until they fit snugly in the tubes.

Then I added two blocks of 1" HDPE under the table top to fit into the recessed of the underside. The blocks were slotted to fit with the table stiffeners cast into the underside. 1" HDPE was the ideal material to use because I already had some. It's old and picked up some stains but still smooth. The blocks are attached with wood screws driven through countersunk holes on the top.

Once I raise the extension tubes and level the table it can be moved forward and back and the HDPE blocks will slide over the transfer bearings and the table stays level. The blocks are long enough to allow the full range of forward and back table movement.

Finally I moved the Table Height Adjustment lever and lock to the right side so the lever won't interfere with the table or fence. I still have to move the Carriage Lock to the right side because it's where I keep reaching for first.

I still have to do a big leg swap among the machines, and a bunch of cleaning and touch up paint scratches, but I'm using the drill press a lot for wood, metal, and plastic and these changes have just made it better. I'm heading toward using it for routing and light machining as well.

Here are the table support tubes in position with bearings on top up against the HDPE blocks:
table support.jpg
table support.jpg (134.84 KiB) Viewed 5202 times
The table top and the HDPE blocks underneath:
table top.jpg
table top.jpg (195.72 KiB) Viewed 5202 times
HDPE blocks.jpg
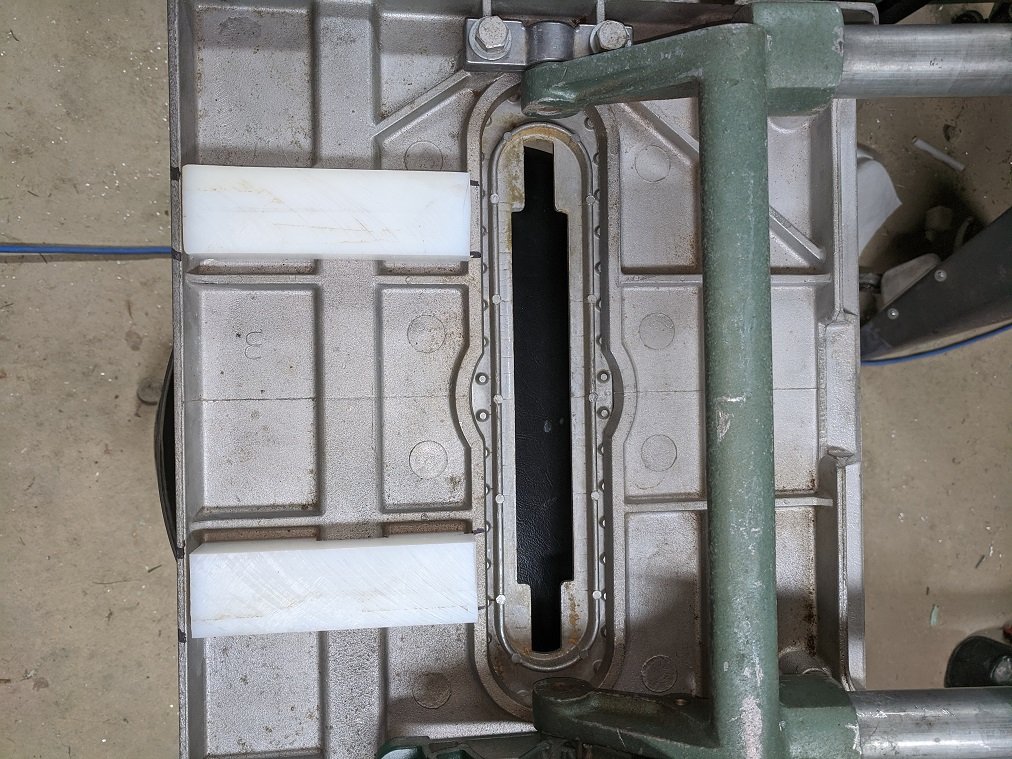
HDPE blocks.jpg (188.62 KiB) Viewed 5202 times
Load transfer bearing top and side view:
transfer bearing top.jpg
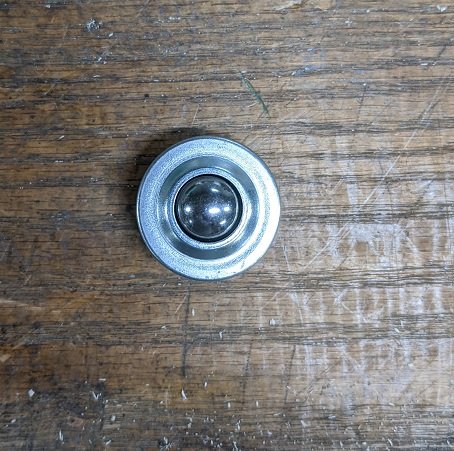
transfer bearing top.jpg (64.1 KiB) Viewed 5202 times
transfer bearing side.jpg
transfer bearing side.jpg (76.62 KiB) Viewed 5202 times
Finally, the Table Height lock and lever on the right hand side:
table adjust handle.jpg
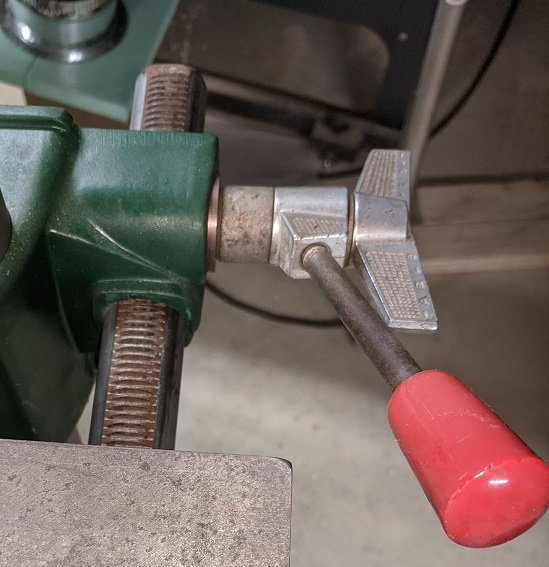
table adjust handle.jpg (53.26 KiB) Viewed 5202 times

Re: Dedicated Drill Press

Posted: Wed Aug 21, 2024 8:37 pm
by dwberry57
Well I finally got the #3 Shopsmith that I bought several months ago, a 510 out of the storage and cleaned it up and then move the table and headstock to the shorty that I had set up with an old Mark V table and head stock. Took the Old Mark V and made a dedicated drill press. Following edma194 sample and am currently using the extension table as support. I think I am going to go ahead and do the HDPE blocks and load transfer bearings. I also added my Woodpeckers DP-PRO Drill press table that I had on my old benchtop drill press. Had to do a little cutting of the back to get it to fit around the bench tubes.

Re: Dedicated Drill Press

Posted: Thu Aug 22, 2024 7:29 am
by rlkeeney
Woodpeckers DP-PRO Drill press table is expensive. What makes it worth the money to you?

Re: Dedicated Drill Press

Posted: Thu Aug 22, 2024 7:30 am
by rlkeeney
How are you going to manage raising and lowering the table?

Re: Dedicated Drill Press

Posted: Thu Aug 22, 2024 9:16 am
by JPG
rlkeeney wrote: Thu Aug 22, 2024 7:30 am How are you going to manage raising and lowering the table?
Or tilt it?

Re: Dedicated Drill Press

Posted: Thu Aug 22, 2024 11:09 am
by edma194
The drawer under the table is a nice idea. If it's attached to the original table that provides your tilt and you raise it like you would the regular table. If you want better raising and tilting capability you can see how I added horizontal way tubes to my drill press and mounted a table carriage on them in this thread: viewtopic.php?p=306089#p306089

Re: Dedicated Drill Press

Posted: Thu Aug 22, 2024 1:46 pm
by dwberry57
rlkeeney wrote: Thu Aug 22, 2024 7:29 am Woodpeckers DP-PRO Drill press table is expensive. What makes it worth the money to you?
I looked at them for awhile, especially for the fence and dust collection for my old drill press. Wife ended up getting it for christmas for me. I do like it. The dust collection on the fence is really good.

Re: Dedicated Drill Press

Posted: Thu Aug 22, 2024 2:01 pm
by dwberry57
edma194 wrote: Thu Aug 22, 2024 11:09 am The drawer under the table is a nice idea. If it's attached to the original table that provides your tilt and you raise it like you would the regular table. If you want better raising and tilting capability you can see how I added horizontal way tubes to my drill press and mounted a table carriage on them in this thread: viewtopic.php?p=306089#p306089
The Woodpeckers table does attach to the shopsmith table. It adds a little weight but not too bad. If I need to take it off, it is 4 nuts and bolts so not a super hard process.