A Slow Boat To Nowhere

This is a forum for intermediate to advanced woodworkers. Show off your projects or share your ideas.

Moderator: admin

User avatar
algale
Platinum Member
Posts: 4828
Joined: Thu Nov 04, 2010 8:13 am

Re: A Slow Boat To Nowhere

Post by algale »

Rod,

I'm no expert when it comes to epoxy. I've used all three (wood flour, silica and cotton fibers). Wood flour I think adds color more than anything. Silica and cotton fibers (microfibers) seem about the same to me. (Hope Shipwright reads this and chimes in and sets the record straight).

About the peak in the deck: it is subtle when I put the mocked up deck in the canoe but it looked better to my eye than a flat deck. A more rounded profile might be even better. I might get that my sanding the peak into more of a radius. I'll experiment with this test piece. I'm sure a real builder would have a more elegant solution.

Thanks for the advice and taking an interest in the project.

Al
RodJ wrote:Lurking for a while on your project, Al, and it's beautiful. As to your question, you don't need a spline. My suggestion is to join the two pieces as you have them (assuming you like the peak) with epoxy, but before joining make sure there's some "tooth" on the jointed edges so the epoxy has a place to bridge. Unlike wood glue, epoxy requires a bit of gap in order to make strong joints.

Better yet, if you are truly concerned about a heavy weight on those end decks, increase the included angle a couple degrees so you have a "v" with the open end down toward the hull. Fill that with thickened epoxy and it's not going anywhere.

Frankly, if you are going to glass the deck side, even the extra v-ness is unnecessary. As you've figured out, epoxy is stronger than the wood.

Really a beautiful project and the choice of wood is going to turn out fantastic. Thank you 1000 times for sharing the project and posting the pictures. Please keep them coming.

EDIT - one thing, I've not heard of using cotton fibers to thicken epoxy. I've used wood flour and silica. Wood flour seems to me to be the best for me. How well do you like the cotton fiber?
Gale's Law: The bigger the woodworking project, the less the mistakes show in any photo taken far enough away to show the entire project!

User avatar
BuckeyeDennis
Platinum Member
Posts: 3800
Joined: Tue Jul 24, 2012 10:03 pm
Location: Central Ohio

Re: A Slow Boat To Nowhere

Post by BuckeyeDennis »

Personally, I like your jointer solution. It cleans up the bandsaw cut and does the taper in one easy operation.

However, I probably wouldn't have thought of it. I would have fastened the workpiece to a straight board at the appropriate taper angle, tilted the table to the crown bevel, and run it though in tablesaw mode, guiding the straight board against the fence.
User avatar
algale
Platinum Member
Posts: 4828
Joined: Thu Nov 04, 2010 8:13 am

Re: A Slow Boat To Nowhere

Post by algale »

I get your jig idea and that would work. Curious if anyone has a jig free solution. I guess since the jointer works, I'll keep using it to make these bevels.
BuckeyeDennis wrote:Personally, I like your jointer solution. It cleans up the bandsaw cut and does the taper in one easy operation.

However, I probably wouldn't have thought of it. I would have fastened the workpiece to a straight board at the appropriate taper angle, tilted the table to the crown bevel, and run it though in tablesaw mode, guiding the straight board against the fence.
Gale's Law: The bigger the woodworking project, the less the mistakes show in any photo taken far enough away to show the entire project!

User avatar
BuckeyeDennis
Platinum Member
Posts: 3800
Joined: Tue Jul 24, 2012 10:03 pm
Location: Central Ohio

Re: A Slow Boat To Nowhere

Post by BuckeyeDennis »

algale wrote:I get your jig idea and that would work. Curious if anyone has a jig free solution. I guess since the jointer works, I'll keep using it to make these bevels.
BuckeyeDennis wrote:Personally, I like your jointer solution. It cleans up the bandsaw cut and does the taper in one easy operation.

However, I probably wouldn't have thought of it. I would have fastened the workpiece to a straight board at the appropriate taper angle, tilted the table to the crown bevel, and run it though in tablesaw mode, guiding the straight board against the fence.
Yep -- a radial arm saw. :eek:
RodJ
Gold Member
Posts: 28
Joined: Sun May 10, 2015 11:29 am

Re: A Slow Boat To Nowhere

Post by RodJ »

algale wrote:Rod,

I'm no expert when it comes to epoxy. I've used all three (wood flour, silica and cotton fibers). Wood flour I think adds color more than anything. Silica and cotton fibers (microfibers) seem about the same to me. (Hope Shipwright reads this and chimes in and sets the record straight).

About the peak in the deck: it is subtle when I put the mocked up deck in the canoe but it looked better to my eye than a flat deck. A more rounded profile might be even better. I might get that my sanding the peak into more of a radius. I'll experiment with this test piece. I'm sure a real builder would have a more elegant solution.

Thanks for the advice and taking an interest in the project.

Al
Al, you are a real boat builder the moment you start studying the plans and building in your head. And the fact that you looked at the deck and are modifying it for a sense of beauty means you are ahead of many. I'm finishing my second but both of mine were duck hunting oriented so they are very utilitarian looking. In fact the first was no more than a shallow draft pole boat. Never saw the water. :eek: The second one probably won't either. lol! :p Anyway, the radius idea sounds really good. I'm looking forward to seeing whatever you come up with for it.

Another construction technique that crosses my mind is building the deck with strips as with the rest of the hull. To land the strips, you'd have to install a curved sawn deck frame to fit athwartship (following what would be imaginary curve where the aft end of the deck strips will land) and install longitudinal risers just below the gunwale. The strip planks would land on the risers forward and aft on the sawn frame.

Just thinking out loud. You are my boatbuilding SS hero, because I got my SS with the idea of building my next just using the SS and hand tools. Now I know it's possible! :D
User avatar
shipwright
Platinum Member
Posts: 1165
Joined: Tue Dec 15, 2009 7:28 pm
Location: Vancouver Island, Canada
Contact:

Re: A Slow Boat To Nowhere

Post by shipwright »

Hey Al, it's looking good.
About the epoxy, fillers, peaked decks and all, here are my thoughts.
-Cambering the deck would be a nice touch but a noticeable peak would be just wrong (IMHO).
You are on the right track with the idea of sanding it to more of a radius but take it all the way to a true radius and it will look great.
-As for the joint, it is a small piece that won't bear much strain but personally, for all the time it takes, I'd add the spline just because. Epoxy is way stronger than the wood but this is a partial end grain butt and it would be a shame if it came apart.
-You can glue your jointed edges with or without any of the additives although a little dust from the species you are using will help hide the line.
-The advantage of mini fibres over the others is that it actually thickens the epoxy and prevents sagging. Wood flour will thicken it but it is still likely to sag when it heats up during cure. You don't have a buildup here so you don't need it. I do like to use it just to make the epoxy into more of a loose putty to be easier to handle.
-Epoxy doesn't need a space to make a strong joint. Perfect joints are just fine. What you don't want is high clamping pressure that forces all the glue out of the joint.
Hope this helps.
Paul M ........ The early bird gets the worm but the second mouse gets the cheese
User avatar
algale
Platinum Member
Posts: 4828
Joined: Thu Nov 04, 2010 8:13 am

Re: A Slow Boat To Nowhere

Post by algale »

Paul,

Thanks for clearing up the epoxy additive issues. I'll play with this practice deck this weekend and try to figure out how to get that true radius.

btw, loved the water ballet video over on LJs....

Al
shipwright wrote:Hey Al, it's looking good.
About the epoxy, fillers, peaked decks and all, here are my thoughts.
-Cambering the deck would be a nice touch but a noticeable peak would be just wrong (IMHO).
You are on the right track with the idea of sanding it to more of a radius but take it all the way to a true radius and it will look great.
-As for the joint, it is a small piece that won't bear much strain but personally, for all the time it takes, I'd add the spline just because. Epoxy is way stronger than the wood but this is a partial end grain butt and it would be a shame if it came apart.
-You can glue your jointed edges with or without any of the additives although a little dust from the species you are using will help hide the line.
-The advantage of mini fibres over the others is that it actually thickens the epoxy and prevents sagging. Wood flour will thicken it but it is still likely to sag when it heats up during cure. You don't have a buildup here so you don't need it. I do like to use it just to make the epoxy into more of a loose putty to be easier to handle.
-Epoxy doesn't need a space to make a strong joint. Perfect joints are just fine. What you don't want is high clamping pressure that forces all the glue out of the joint.
Hope this helps.
Gale's Law: The bigger the woodworking project, the less the mistakes show in any photo taken far enough away to show the entire project!

RodJ
Gold Member
Posts: 28
Joined: Sun May 10, 2015 11:29 am

Re: A Slow Boat To Nowhere

Post by RodJ »

Shipwright and Al, I won't argue with a retired boat builder but maybe we are imagining different things when we talk about perfect joints and joints with some gap. I didn't mean to imply having a poorly fitted joint, but like Shipwright said, you don't want pressure on the joint.

The reason I add additional comment is my concern that if you do have a perfectly fitted joint, then you would typically clamp it closed, and the pressure will cause the epoxy to squeeze out as pointed out by Shipwright.

In reading his comments, I am reminded to add that - especially with end grain - you should consider putting some thin (either warm or thinned) epoxy on the end grain first to allow it to suck it up, then add the thickened epoxy. Since thickened epoxy has lower density of epoxy, I have been warned that the wood can draw epoxy in and further reduce the epoxy in the joint itself.

The epoxy is going to be stronger than the wood itself (in general and assuming it is mixed well). My comments are based on both experience with epoxy, though less extensive certainly on boats than his, and the advice of many builders and boat building authors who use epoxy.

Looking forward to seeing how it all comes out!
User avatar
algale
Platinum Member
Posts: 4828
Joined: Thu Nov 04, 2010 8:13 am

Re: A Slow Boat To Nowhere

Post by algale »

Appreciate the advice, Rod. I meant to respond to your prior post about how to camber the deck using the strip method. That would work and I'll give it some thought.
Gale's Law: The bigger the woodworking project, the less the mistakes show in any photo taken far enough away to show the entire project!

User avatar
algale
Platinum Member
Posts: 4828
Joined: Thu Nov 04, 2010 8:13 am

Re: A Slow Boat To Nowhere

Post by algale »

I am continuing to experiment with deck shapes.

My first experiment left me with a peaked deck. I tried to sand this into a smooth radius but that proved to be a non-trivial job. I got the peak rounded over but the only shape I could get was a kind of hump. Nothing I would call a radius.

Experiment no. 2 was to mock up a semi-circular panel. To do this, I used a birdsmouth joint (a first for me and something I learned off of one of Shipwright's posts). Although the canoe is only about 7-8 inches at its widest where the decks go, I estimated that I wanted an arc from a circle about 20 inches in diameter to keep the visible radius not too great. I used a calculator I found on this boat magazine website http://www.duckworksmagazine.com/10/how ... /index.htm, to calculate the necessary thickness and width of the pieces to make a complete cylinder. These ended up being 16 pieces about 3/4 thick by 4 3/8 wide with angles of 20 and 70 degrees forming the birdmouths. Of course since I wasn't doing a complete cylinder I only needed 4 pieces to get the part of the arc I wanted. In fact, I barely needed more than two. Had I been smarter I would have done three pieces. My method ended up being quite wasteful.

Cutting the pieces was really easy to do on the Shopsmith, tilted table and all. But the panel was a challenge to glue up because I did not do a complete cylinder. So, for purposes of this mock up I just used some CA glue, which sets quickly. When I do the real deck I will be using epoxy and will have to figure out some other way of clamping (BuckeyeDennis suggested pinch dogs on another thread and I think he's put me on the right track).

The panel came out fine and the cedar sanded out to a pretty smooth arc on the Shopsmith beltsander with an 80 grit belt, just working by eye, resting the bottom on the table and rotating the panel around an imaginary point. (I did knock off the peaks with a plane first so there wasn't as much sanding to be done).
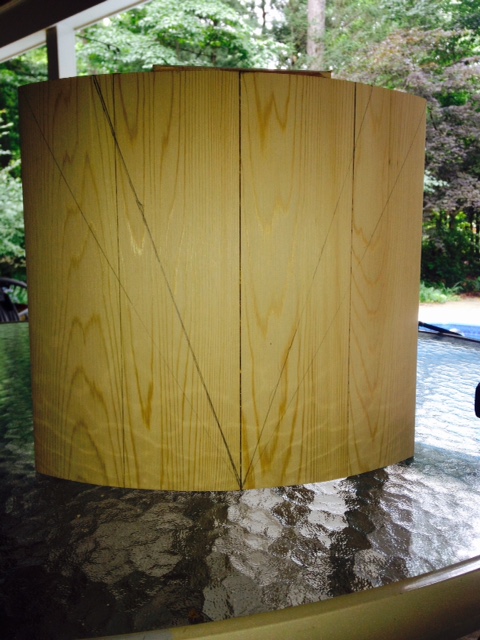
image3.JPG
image3.JPG (127.01 KiB) Viewed 7038 times
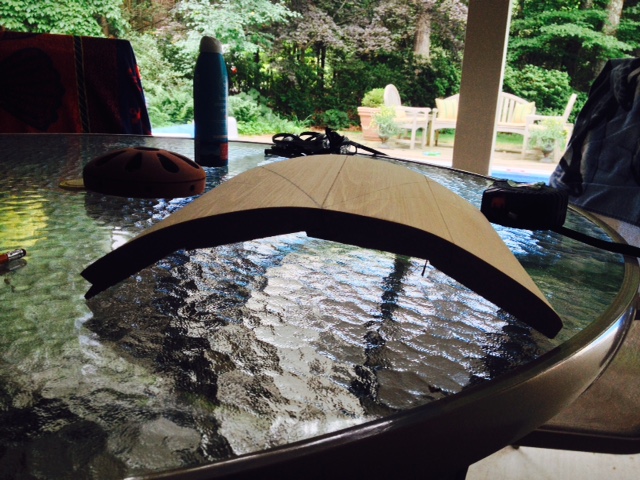
image1.JPG
image1.JPG (165 KiB) Viewed 7038 times
Then I cut a wedge out to match the canoe shape. I used the Shopsmith band saw and free handed it. Cleaned the edges up on the belt sander.

Side by side with the original deck, I much prefer the smooth shape of experiment no. 2 (true radius) to experiment no. 1 (peaked and then sanded to a hump). Experiment 2 is on the left in the below photos.
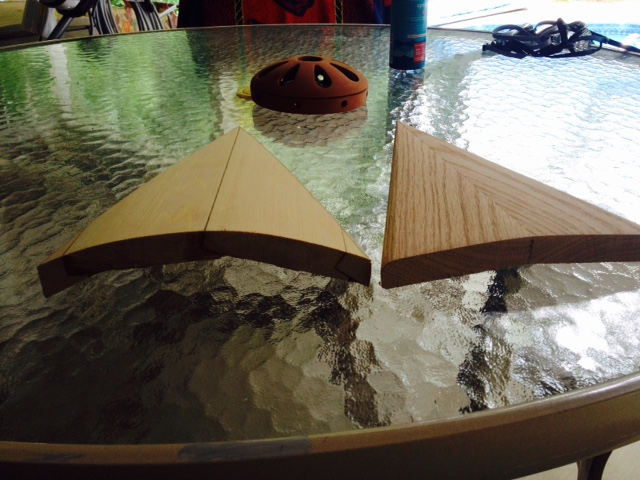
image4.JPG
image4.JPG (131.26 KiB) Viewed 7038 times
But I much prefer the converging look of the grain on experiment no. 1 than the straight grain on experiment no. 2 (doesn't show in the above photo but you will see how ugly the grain looks in the photos below where it is mock installed in the canoe).
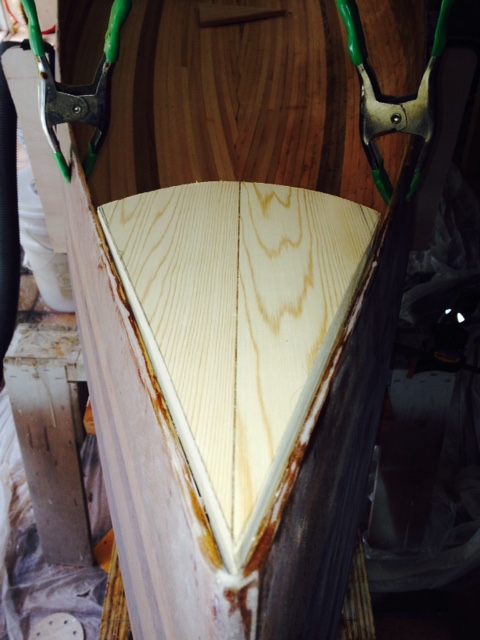
image3(1).JPG
image3(1).JPG (97.3 KiB) Viewed 7038 times
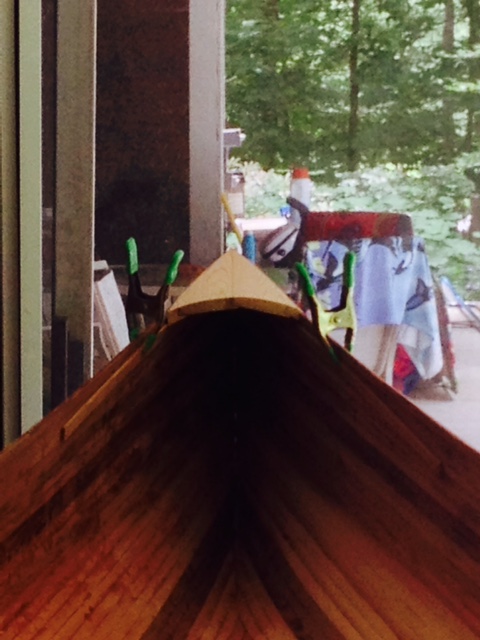
image2(1).JPG
image2(1).JPG (98.32 KiB) Viewed 7038 times
In Sapele, which has much straighter grain and less or no cathederal arching as compared to the cedar I used in this mock up, the difference may not be quite as bad.

But it occurs to me that I could in theory veneer experiment no. 2 with a couple of triangular slices of Sapele arranged as in experiment no. 1 to get the same effect of the grain converging (I say "in theory" because I have never veneered anything but I figure there's enough expertise on the forum to walk me through it).

Another draw back on experiment no. 2 is the bottom edge. Smoothing the outside was easy. I've done nothing to smooth the inside but I can tell it will be very hard to do. The facets from the birdsmouth joints are very ugly and distracting. Of course in a complete cylinder these would be on the inside and never visible. Experiment no. 3 may be to try to cooper the panel with many more narrower pieces oriented vertically.

Any and all comments, criticisms, suggestions are welcome.

-Al
Gale's Law: The bigger the woodworking project, the less the mistakes show in any photo taken far enough away to show the entire project!

Post Reply